“
WALKTHROUGH
Len Green
lengreen@hotmail.com
{A}
This walkthrough describes ALL the actions which you must take in
order to succeed, together with a relatively small number which are not essential
to completing the game.
N.B. The game contains quite a few ‘red herrings’.
However,
please don’t use this walkthrough unless you absolutely have to.
Some aspects which are not absolutely imperative have been omitted. A lot
of these are interesting and provide much of the background story to the game,
and particularly to the fascinating (and artistic) character, scenery and
history of Norrköping … a relatively small town in
{B} “Warning”:- The main purpose of this game is to examine items, interview people, view the interesting sights and scenery, and generally ‘act the tourist’, etc. As mentioned, some of these actions and visitations are essential, but many are not, and quite a few are ‘red herrings’.
If you simply take this walkthrough in your hand and follow exactly what to do and not to do, you can probably finish the game very quickly. This however would completely defeat its whole purpose!
{C}
The walkthrough does not do justice to “East Side Story”! A very great
part of the interest and beauty of the game is wandering around through the vast
number of locations, views, and residences… There are actually so many that
I’m pretty certain that I missed a few ! :~)
There is quite a lot of interesting material in
Norrköping, a small but quite important city whose population is a little under
100,000 and whose original roots date back to the 14th century, or earlier!
{D}
This is a
first-person game and much of the intricacy and pleasure lies in browsing around
… and as aforementioned there is a lot of that. I
personally frequently ‘got lost’ looking for some location or object
(even occasionally inside a residence!), and sometimes after finding it, lost my
way again on returning.
Due to the complexity of some of the locations, I
occasionally completely missed some essential area of terrain!
Much of the beautiful photography of both exteriors
and interiors of this Swedish town is only revealed through these ‘wanderings’.
It would be a pity to miss even
those which are not described here due to being inessential to
finishing the game.
{E}
“ESS” does not contain too many ‘stand-alone’ puzzles and those
included are generally not too difficult.
However there IS one main puzzle for some players
which runs right throughout the game. It
is the necessity to ramble around (maze-like) without losing one’s way and
getting frustrated due to this.
But since this is one of the main and consistent puzzles in the game,
this walkthrough contains NO precise direction-instructions as appear in some
walkthroughs (including some of my own in this Carol Reed series).
The player is only told where to go, but not exactly how to get
there, or even how to move around when actually there!
In other words there are NO written instructions of the sort:-
Move
right (or left) twice; then move forward; then right; then move forward three
times; and finally move right again.
But in a few
cases where it may be difficult to describe an exact location in simple
straightforward words, a full graphic of the area is included.
{F} On entering every new location, it is highly advisable to browse around as much as possible in order to explore the general layout. However, the walkthrough never tells you explicitly to do this!
{G}
You should most certainly NOT have to follow the same
order of accessing locations as described in this walkthrough since the game is
VERY non-linear. There are a VERY GREAT number of permutations of
routes, and it is most unlikely that two players will follow exactly the
same itinerary. In addition
it is most likely that this walkthrough is not the best or even optimum route to
play the game (and finish it completely)!
Some
locations of course will not appear on the map until you have completed certain
tasks, and so a particular order is sometimes
obligatory. Other than this, you are free to visit (&/or revisit) as
you wish !
{H}
There is no need to
describe ANY of the ‘mechanics’ &/or interface of the game. It is
all contained in the Manual which is to be found in the “ESS” folder on your
Hard Disc (after installing of course), and also as a shortcut in the same
program group as the installed game.
{I} There is only one extremely short sequence where you have to act rather quickly, but if you do not succeed you are returned immediately so that you can try as often as you need. There is no so-called ‘bad language’ or ‘adult material’. It is all first person and mouse driven point & click. There are full (and excellent) English subtitles for ALL speech.
{J} As in most games, it is easy to make a wrong or redundant
move! So it is advisable to save frequently.
There
are 200 save-slots… in case anybody needs that many!
Since each save is small, saving and loading is very rapid, presenting no
delays to progress.
N.B.
There are absolutely NO dead-ends or crashes in the game!
{K} EVERY
TIME you obtain items, they appear in your inventory.
It’s always worthwhile observing each new inventory item by
right clicking on it to get an excellent greatly enlarged
picture of the item together with a very brief description of it.
N.B.
It is imperative to view, and
sometimes to manipulate, some of the inventory items in close-up to complete the
game.
{L} There
are a number of puzzles in the game. Wherever
there is an outright spoiler, I have inserted it in smaller print and a light
green color that is not TOO easy to read, as follows:-
Spoilers
are inserted like this ………
I have
done this deliberately since many players do not want to see spoilers unless
absolutely essential.
Walkthrough
[
1 ] The
Allotment {1st
visit}
*****
Search VERY closely to the
hammock (in the opening scene) and look for a rock near to a number of vertical
yellow and white planks.
*****
Look at the rock and then move it.
*****
Pick up the primitive key.
*****
From inventory, use the primitive key to open the shed.
*****
Get the watering can from the shed.
*****
Close the shed door.
*****
Zoom in on the tub of water beneath the standing tap.
*****
From inventory, fill the watering can with water.
*****
Zoom in on the (thirsty) cucumbers.
*****
From inventory, use the filled watering can to water the cucumbers.
*****
Exit the allotment. You find
yourself on a map with 3 (so far) locations.
*****
Choose the ‘Stina in the Store’
location, and go there.
[
2 ] Stina in the Store
{1st
visit}
*****
Enter the store.
*****
Talk to Stina, and exhaust all dialog options.
(N.B. You can leave
this until later if you like)!
*****
Exit to the map and go to Carol’s ‘Home’.
[
3 ] Home (Carol Reed’s apartment) {1st
visit}
*****
Pick up the letter from the floor.
*****
Read the letter from Jonas (and notice his photograph… he’ll return
later in the game!).
*****
Read the newspaper article… “Vagrant killed in salesman’s apartment”!
This
article is the impetus for the whole game.
*****
Find and take the pliers.
*****
Browse around as much as possible. There
is quite a lot to see there, but not TOO much to do there at present!
(Notice the ‘tidy’ bedroom, and the photo of the walkthrough-writer
on the chest of drawers??).
*****
Exit Carol’s apartment.
*****
Go to the new location on the map; i.e. ‘Anders Borg’s Apartment’.
[
4 ] Anders Borg’s Apartment {1st visit}
*****
Enter the front door of the apartment building.
*****
Walk up a flight of stairs to the elevator.
*****
Enter the elevator
*****
Press the button for the 4th floor.
*****
Exit the elevator.
*****
Find the front door to Anders Borg’s apartment.
*****
Look down to floor level and see a door stopper… There appears to be something
hidden there.
*****
Remove the small key from the door stopper.
*****
Look around near to the front door to Anders Borg’s apartment, and zoom in on
a box inlaid into the wall (maybe meant as a fuse box??).
*****
From inventory, take the small key and open up the box.
*****
Take the apartment key.
*****
Close the box.
*****
From inventory, use the apartment key to open the lock on the front door to
Anders Borg’s apartment.
*****
Open the front door and enter the apartment
*****
Go to the stripped down bed.
***** Read the note to Mr. Borg from Inspector Ryde.
*****
Browse around as much as possible.
*****
Go to the front window looking out onto the building opposite.
*****
Open the window.
*****
Have a good look at the views outside the apartment.
*****
Notice the shirt hanging just outside the window.
*****
Grab the shirt. No go… “I
can’t reach it”!
*****
Close the window.
*****
Return from the window to near the front door of the apartment.
*****
Notice a long thin yellow object standing up in the corner of the room
very near to a pair of shoes.
*****
It’s a shoe horn… pick it up.
*****
Return to the shirt outside the window.
*****
From inventory, use the shoe horn to prod the shirt.
*****
Observe the coat hanger in front of the shirt.
*****
Grab both the shirt and the coat hanger.
BUT… OOPS… tinkle tinkle… “Something fell from it”!
(It’s worth while paying attention to the road below).
*****
Inspect the shirt hanging near the front door of the apartment… is it
the same size as the one outside the window?
(N.B.
It was impossible to do this previously! )
*****
Leave the window and the apartment. Descend,
using the elevator to the 1st floor and then the stairs, and exit the front door
of the apartment building.
*****
Look around outside the building and see the manhole… apparently
there’s something useful there.
*****
Return to Borg’s apartment.
*****
Look again closely at the pair of shoes close to the front door.
*****
Pick up a shoelace.
*****
Go to the kitchen.
*****
Examine the door of the refrigerator.
*****
Take the fish-shaped magnet (In inventory look at it, and its underside).
*****
In inventory, combine the shoelace and the refrigerator magnet or vice
versa… obtaining a ‘refrigerator magnet tied to shoelace’.
*****
Leave the room and the apartment building and go to the manhole as
previously.
*****
From inventory, use the refrigerator magnet tied to shoelace on the
manhole… you will fish out a pair of ‘keys from manhole’.
*****
Re-enter the apartment building and the elevator and exit at the 4th
floor, again.
*****
However, do not enter Mr. Borg’s apartment.
Instead, walk up the flight of stairs close to his apartment and look at
the door to the attic.
*****
From inventory, use the keys from manhole to open the attic door and
enter.
*****
Browse around there until you come across storeroom # 66… It is shut
with a padlock.
*****
From inventory, use the ‘keys from manhole’ to open the padlocked
door to the storeroom # 66.
*****
Examine the mattress on the floor… “It seems like someone has slept
… or lived … here”.
*****
Look at the (thatched) box. It’s
locked.
*****
In inventory, use the pliers on the coat hanger, or vice versa, and
obtain a modified coat hanger.
*****
From inventory, use the modified coat hanger on the keyhole to open the
lock.
*****
At the top of the box is a cushion… take it.
*****
Inside the box (underneath the cushion) is a passcard with strange
symbols and 3 newspaper clippings.
***** Pick
up the passcard with strange symbols.
*****
Read the 3 newspaper clippings… as follows:-
~~~ “Skateboard “barn”
opens”.
~~~ “The Gusum
factory closes down”.
~~~ “Obituary” for Mrs.
Elvira Wallin.
*****
Close the box.
*****
Leave the storeroom and attic. Descend,
using the elevator to the 1st floor and then the stairs, and exit the front door
of the apartment building.
*****
Exit to the map and go to one of two new locations, i.e. ‘The Library’.
[
5 ] The Library {1st visit}
*****
Enter the library.
*****
Access the computer.
*****
Read up about the TRUE history of the Gusum factory… and
the modern zipper, which was invented in
*****
Read up about the interesting life story of an unusual woman… Elvira
Wallin.
*****
Leave the computer.
*****
Exit the library and on the map go to the other of the two ‘new’ locations,
i.e. ‘The Skateboard Barn’.
[ 6 ] The
Skateboard Barn
*****
Enter the Skateboard Barn.
*****
Turn around and see the brown door to the office (adorned with “Lucky
7”, “Tattoos”, etc.).
*****
Open the door and enter the office.
*****
Talk to the manager (Tony Hesse), and exhaust all dialog options.
*****
Carol asks for information about Viktor Wallin, and an old friend of his,
Richard Svensson.
*****
Richard Svensson’s address is apparently knocking around somewhere in
the skateboard precincts amongst the print-outs of the Honorary Members list…
but the manager doesn’t know where.
*****
Open the door and exit the office
*****
Enter the (main) Skatehall of the Skateboard Barn and look around for the
Honorary Members list.
*****
Page #2 (of 2) of the Honorary Members list is fairly easy to find (You
may come across Page #1 first. That’s
fine! Pick it up immediately).
It’s near to a
long bench, with some papers and other rubbish on the floor.
*****
Pick up Page #2 of the Honorary Members list.
*****
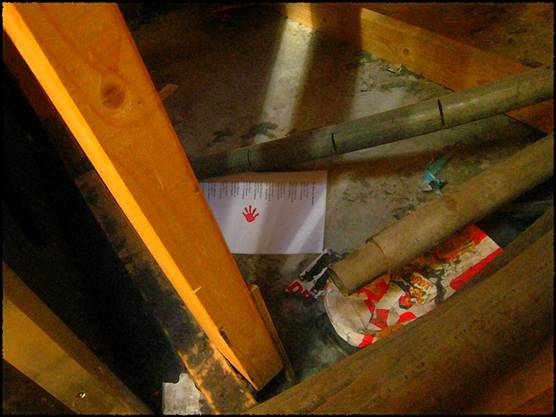
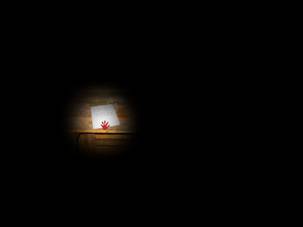
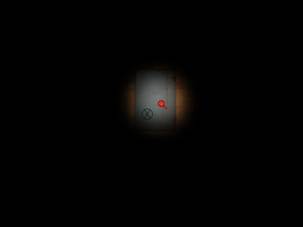
Page #1 (of 2) is more hidden, and hence a bit more difficult to find.
In case anybody has real trouble, see the view inside the Skateboard Barn
below… the ‘red hand’ shows the actual location of page #1 of the Honorary
Members list.
***** When
you grab the 2nd of the 2 sheets (it’s of no importance in which order), they
automatically ‘link up’ revealing the address of
Richard Svensson, and Carol says “So now I have his address" the
address of Richard Svensson.
*****
Exit the door of the Skateboard Barn.
*****
Exit to the map and go to the new location, ‘Richard Svensson’.
[ 7 ] Richard
Svensson {1st
visit}
*****
Try ringing the bell… “He doesn’t seem to be home at present”.
*****
Exit to the map, choose the ‘Stina in the Store’ location, and go
there.
[
8 ] Stina in the Store {2nd
visit}
*****
Enter the store.
*****
Talk to her, and exhaust all dialog options.
*****
Exit to the map and go to ‘Richard Svensson’.
[ 9 ] Richard
Svensson {2nd
visit}
*****
Ring the bell again. This time
Richard is at home.
*****
Talk to him, and exhaust all dialog options.
*****
Before he agrees to give Carol any free information, he demands that she
should do some jobs for him!
*****
Exit to the map and go to the new location, ‘The River Park’.
[
10 ] The
*****
Go one step forward and then right
*****
See a newspaper on the ground and pick it up/
*****
Read the article by the renowned journalist Randy Sluganski (haven’t I
come across that name somewhere before?... in connection with some “JA+”
thingie or something?).
*****
Browse around as much as possible.
*****
Search for Svensson’s missing spectacles.
*****
If you have very great trouble finding Richard’s spectacles, the
following hints should help:-
They are on the
grass near a river, exactly opposite 2 buildings being constructed (and beneath
the huge crane working on that job)!.
*****
Look at the spectacles and pick them up.
*****
Examine the spectacles in inventory and notice their elastic attachment.
*****
Look for Svensson’s missing watch.
*****
If you have very great trouble finding Richard’s watch, the following
hints should help:-
It’s quite
close to the location where his spectacles were found (actually, exactly 5
‘clicks’ away… ‘backwards’), and high up on a tree.
*****
Look at the watch and take it. You
can’t… it’s too high up! (It’s a silver color and glitters… apparently
a magpie has stolen it!).
*****
Maybe something in inventory will help you reach the watch?...
Still impossible!
*****
Continue looking around carefully.
*****
Spot a Y-shaped twig.
*****
In case anybody has real trouble, see the view below.
*****
Grab the twig. No luck…
it’s behind some wire fencing.
***** From
inventory, use the shoe horn to move the twig, and take it.
*****
When you look at it in inventory, you se that Carol has also managed to
snag a few pebbles.
*****
In inventory, use the elastic from the spectacles on the Y-shaped twig,
or vice versa… this makes a slingshot.
*****
Return to the location where you found the watch.
*****
Use the slingshot on the watch (i.e. use the crosshairs on, or just a
tiny bit under, the watch… You may possibly have to do this more than once?!).
*****
Zoom in on the watch, and pick it up.
*****
Exit the
[ 11 ]
Richard Svensson {3rd
visit}
*****
Give Richard his watch and his spectacles.
*****
Talk to him, and exhaust all dialog options.
*****
Exit to the map and go to the new location, ‘The Oil Mountain’.
[
12 ] The Oil Mountain
{1st
visit}
*****
Walk forward only (quite a number of times) until you
can’t go forward any further.
*****
Turn left and see the very large gates to ‘The Tunnel’.
*****
Approach the gates and open them.
*****
Enter the tunnel. There are
some things that you CAN (and should) do now, but others you will
have to wait and do later in the game.
*****
(Although not essential, it
would be a good idea at this stage to take a good look around the tunnel from
one end to the other and back ).
*****
Immediately after entering the tunnel take a step forward
and notice a ramp on your right.
*****
Walk up the ramp and a few steps forward.
*****
Look out for a place which has a couple of discarded soup cans on the
floor, a fan mechanism of some sort, and particularly a mattress.
*****
Zoom in on that mattress and observe an envelope partially exposed and
partly hidden beneath it.
*****
Grab the envelope addressed to Viktor Wallin, c/o ‘The Salt Field
Shelter …..… Norrköping’… Carol exclaims -- “The Salt Field
Shelter?”.
*****
From inside the envelope read the letter to Viktor sent by Richard.
It’s worth while reading both sides fairly carefully since it contains
some matters which have a bearing on the narrative and the game.
*****
Exit the tunnel.
*****
Exit the
[
13 ] The Salt Field Shelter
{1st
visit}
*****
Talk to the lady in charge of the shelter, and exhaust all dialog options.
***** Exit the ‘The Salt Field Shelter’, and on the map go to ‘Home’.
[
14 ] Home (Carol Reed’s apartment) {2nd
visit}
*****
As Carol enters her apartment, her phone is ringing.
*****
It’s Richard Svensson on the line… listen to what he has to say!
*****
Exit ‘Home’, and on the map go to ‘Richard Svensson’.
[ 15 ]
Richard Svensson {4th
visit}
*****
Richard Svensson gives Carol a torn piece of paper with a rhyming riddle written
some time ago by Viktor Wallin.
*****
Take the ‘poetic’ riddle.
*****
Read and interpret Victor Wallin’s
torn piece of paper with a rhyming riddle (poem).
Concentrate on
the first line of the poem.
“Right above
my resting place”
Would that imply
somewhere above Viktor’s mattress (which is in the tunnel)?
Now read the
third line of the poem.
“Solution at
the flagstick’s base”
Have you seen a
“flagstick”… how about a golf course?
*****
Exit to the map and go to the ‘The Oil Mountain’.
[
16 ] The Oil Mountain
{2nd
visit}
*****
From the map, walk forward only (a few times ..… but not
as many as previously ..… see [ 12 ] ).
*****
Turn right and see a golf-course flag.
*****
Approach the golf-course flag (N.B.
It was impossible to do this previously! )
*****
Look down at the hole beneath the flag.
*****
Pick up the golf-course plan.
*****
In inventory, examine the golf-course plan.
*****
Return to the main path and continue towards the tunnel gates (as before).
*****
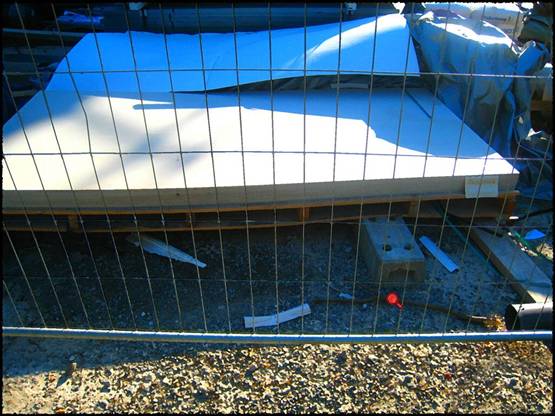
A little before the gates, turn left onto a path (N.B.
Which was not accessible previously!) …
See the view below.
*****
Carry on up this path until you reach the top of
*****
To its left, is a somewhat similar but rectangular shaped construction.
*****
Walk in the direction of this rectangular shaped construction.
*****
Circle around it until you come across an entrance.
*****
Enter and examine 4 slanted slats.
***** You have to “open” these slats before you can go further inside.
***** If you have trouble proceeding, the following graduated hints should help (I would respectfully recommend reading only line by line for as much as you ‘need’, and not go straight to the spoiler at the end):-
In inventory, read
and interpret Victor Wallin’s torn
piece of paper with a rhyming riddle (poem).
Read the fifth line
of the poem.
“First turn up
all four real quick”
Would that refer to
the 4 slats?
Now read the last
line of the poem.
“Then, one, two,
four, six does the trick.”
How many numbers are
mentioned in the above line?
And how many slats
are there at the top of the mountain?
In inventory, have a
very good look at the golf-course plan.
What could those
numbers on the plan refer to?
Look at the golf
‘holes’ on the golf-course plan marked with those numbers.
What is the
particular significance of them?
Notice the colors of
those numbered golf ‘holes’.
In order, they are:-
1 is red; 2 is brown; 4 is green; and 6 is blue.
Observe the colors
of the 4 slats… 4 similar colors !!!
SO…FINALLY
…… Click on all 4 slats (in any order) so that they are positioned
‘up’ instead of ‘down’.
Then click on the 4
slats in the exact order as follows:-
Red colored which is
bottom left; Brown colored which is top right; green colored which is bottom
right; and finally blue colored which is top left.
***** An opening is revealed.
***** Enter and see a white ball inside.
***** Pick up the golf ball.
***** Examine the golf ball in inventory and read the writing on it “The Leesen Fortress ....... Look over the South West corner”.
Carol exclaims “The Leesen Fortress ....... I know where that is”.
*****
Go right down from the top of the ‘
***** Choose the ‘The Leesen Fortress’ and go there.
[ 17 ]
The Leesen Fortress {1st
visit}
***** Look around the area… adorned with tons of ‘artistic-graffiti’.
***** There is a short stairway (3 or 4 wooden steps with a double wooden barred hand ‘rail’ on the left side)
***** Walk up and go to the right.
***** Look at and read the red colored brochure describing ‘The Leesen Fortress --- A Brief History’.
***** Descend the stairs and look around some more. There is a much longer stairway (about 15 concrete steps with a single metal hand rail on the left side).
***** Walk up and wander around the sort of balcony (above ground level).
***** One corner is somewhat lighter brown in color… go there!
***** Turn left and look around.
***** There is some writing in white on one of the large brown rectangular slabs of rock.
***** Carol exclaims “So this must be the southwest corner”.
***** Look and read the writing on the wall.
***** Zoom in on the writing “Look for 3 Green Holes” (and then zoom out again).
***** Immediately above the wall on which this message appears is a strip of scenery… Examine it.
***** You can see a partially yellow colored tower in the background.
***** Look at it… Carol says “That’s the Belvedere! It’s one of the highest places in town”.
***** Exit the whole of the ‘Leesen Fortress’ area.
***** From the map go to the new location ‘The Belvedere’.
[ 18 ]
The Belvedere
***** Look at and read the placard describing ‘The Belvedere’.
***** Go up the path and enter the tower.
***** Climb the stairs and see a telescope… the eyepiece is towards the right (of the screen) and it slants down towards the left.
***** Pan carefully through the whole scene… then move (right or left arrow) to a second panorama, and do the same.
***** Stop looking through the telescope.
***** Move around and see another telescope… this one has the eyepiece towards the left (of the screen) and it slants downwards to the right.
***** Pan carefully through the whole scene… then move (right or left arrow) to a second panorama, and do the same.
***** You should see something of importance… through the second telescope only!
In case you see nothing, you’ve missed
something in the previous section [ 17 ]
Carol
says “That looks like 3 Green Holes! It’s
in Arken’s Rosearium”.
*****
Leave the telescope and exit the tower.
***** Return downwards a step or so only, and look to the left.
***** Notice a thin twig, and pick it up.
***** Continue down to the bottom of the path, exit ‘The Belvedere’ onto the map, and go to the new location ‘Arken’s Rosearium’.
[ 19 ]
Arken’s Rosearium
***** Look around the Rosearium.
*****
It’s not a very large area and it shouldn’t be difficult to find the
‘3 Green Holes’.
*****
View them in close-up. You
can only see TWO green holes in this perspective.
The hole on the extreme left of the screen is actually the middle
‘green hole’.
*****
Zoom in on it.
*****
Look at the object on the floor of the hole and grab it.
It’s a letter which has been partly damaged.
Carol reflects "Well, the fountain is completely dry, but it didn't
prevent water from destroying the message".
*****
There is a place (fortunately) preserved at the bottom of the message.
***** Exit ‘Arken’s Rosearium’ onto the map, and go to the new location ‘The Skandia Bank’.
[ 20 ]
The Skandia Bank {1st
visit}
*****
Zoom in on the electronic lock device.
*****
From inventory, use your passcard on the appropriate slot.
*****
Enter the code… this is virtually a Mission Impossible.
Since there are ten thousand permutations, it is almost impossible to
guess the correct code (and, as a matter of fact even if you do guess right, it
will not react at this stage!).
*****
Exit the Bank and from the map return to ‘Richard Svensson’s’.
[ 21 ]
Richard Svensson {5th
visit}
*****
Talk to Richard, and exhaust all dialog options.
*****
Amongst other things, he advises “….. I think you can find some hints
on the wall at the ‘The Bow Of Hope’”.
*****
Carol says “I’ll run over there right away”.
*****
Exit ‘Richard Svensson’s onto
the map, and go to the new location ‘The
Bow Of Hope’.
[ 22 ]
The Bow Of Hope
*****
Walk forward 4 or 5 times and see many notices fixed to the wall on the
left hand side.
***** Turn to the left and look at them… and read any that look interesting.
***** You’ll see one which has 4 lines of hieroglyphics similar to those on the passcard in your inventory… but that doesn’t seem helpful. N.B. If you count them, you’ll see that there are 26 symbols… letters of the (English) alphabet ?
***** Another notice has only one line, but there are more hieroglyphics similar to those on the passcard in your inventory.
***** Trouble is, 2 of these hieroglyphics have been obliterated by bird droppings.
***** How can these be cleaned?
***** From inventory, use the shirt to clean the bird droppings.
***** This will enable you to obtain a code.
If you don’t find it helpful:- the following few graduated hints should help (I would respectfully recommend reading only line by line for as much as you ‘need’, and not go straight to the spoiler at the end):-
Count how many
hieroglyphics are in that line.
Compare the 4
hieroglyphics on the passcard in inventory and identify them amongst the line of
10 hieroglyphics on the wall.
Counting from the
left, this will give you a 4 digit number.
Remember that the
leftmost number is a zero and not a one.
The code is
therefore 1, 9, 7, 2.
***** Exit ‘The Bow of Hope’ onto the map, and go to ‘The Skandia Bank’.
[ 23 ]
The Skandia Bank {2nd
visit}
***** Repeat what you did in section [ 20 ] .
***** Now that you’ve deciphered the code (1, 9, 7, 2), enter it using the keypad.
***** Open the door and enter the safe deposit rooms.
***** Do whatever you can inside the safe deposit area. It seems, however, that there’s nothing you can do at present!
***** Exit the safe deposit rooms and the Bank, and on the map go again to ‘The Leesen Fortress’.
[ 24 ]
The Leesen Fortress {2nd
visit}
***** As previously [ 17 ], there is a stairway consisting of about 15 concrete steps with a single metal hand rail on the left side.
***** Walk up and wander around the sort of balcony (above ground level).
***** Observe in close-up a bicycle lying on its side somewhere there.
***** Click on the middle of the handlebars... Carol exclaims “I want that lamp, but it’s too far away”.
***** From inventory, use the long twig on the bicycle lamp … “Whoops!”.
***** Return down the stairs and look around nearby for the lamp which must have fallen down from above.
***** Find the lamp (just) on the grass.
***** Pick up the bicycle lamp.
***** Exit the whole of the ‘Leesen Fortress’ area.
***** From the map go again to the ‘The Oil Mountain’.
[ 25 ]
The Oil Mountain {3rd
visit}
*****
Walk forward only (quite a number of times) until you
can’t go forward any further.
*****
Turn left and see the very large gates to ‘The Tunnel’.
*****
Approach the gates and open them.
*****
Enter the tunnel.
*****
Immediately after entering the tunnel take a step forward
and notice a ramp on your right.
*****
Walk up the ramp and ONE step forward.
*****
Turn right and see a dark entrance
*****
Enter into the darkness… you can’t go any further since it’s
impossible to see anything.
*****
From inventory, use the bicycle lamp to find your way around.
*****
Turn left and by lamplight see a heavy door.
*****
Open the door, turn right and look around.
*****
See an adjustable spanner on a white block of some sort.
*****
Grab the spanner.
*****
There may be a temptation to exit, but don’t do so yet…
there’s more to be found further inside (a bit tricky to maneuver there!).
*****
On a table see a white sheet of paper.
Zoom in on it. It appears to
be a hint concerning those slats
that you encountered in [ 16 ]
.
… See the graphic below (left hand side).
*****
Continue until you find a closed grey colored box.
*****
Open it. You can’t… Carol
exclaims “There’s no way to open it”.
… See the graphic below (right hand
side).
Do you see anything in common between the grey box ad the
abovementioned white sheet of paper?
Yes… the sign of an X inscribed inside a circle.
This would indicate that there’s something connecting this second
‘slats-puzzle’ with the closed grey box.
*****
Exit back into the tunnel itself, and turn right.
*****
Continue walking along that same ramp in the same direction as before (i.e.
towards the locked exit from the tunnel).
*****
After a few steps forward you will come across a bunch of tubes hanging
from the wall on your right.
*****
Turn right and see a dark entrance
*****
Enter into the darkness… you can’t go any further since it’s
impossible to see anything.
*****
From inventory, use the bicycle lamp to find your way around.
*****
Turn right and by lamplight, see a poker.
*****
Pick it up.
*****
Exit back into the tunnel itself, and turn left.
*****
Leave the tunnel, but not the ‘
*****
Return to the slats at the top of the Mountain… if you need any
assistance, see [ 16 ].
***** Again you have to “open” these slats, but this time in a somewhat different manner.
***** If you have any trouble, the following should help:-
Remember the
illustrations on the white sheet of paper in the (first) dark chamber in the
tunnel.
Click on all 4 slats
so that they are pointing upwards.
The click on only 2
slats in the following order:- bottom-left (red) and then top-right (brown).
You should hear a
click.
***** Return to the tunnel and go into the first dark entrance [ 25 ].
*****
As before, go to the grey box.
It is now open… apparently the manipulation of the slats
just previously caused it to open.
*****
Inside the open grey box is a file… take it.
*****
Exit the dark location, the tunnel, and the whole ‘
*****
On the map, choose ‘The Library’.
[
26
] The
Library {2nd
visit}
*****
Enter the library.
*****
Access the computer.
*****
Read up about the background and history of ‘The Fiskeby Station’ (2
pages).
*****
Leave the computer.
*****
Exit the library, and on the map go to the new location, ‘The Fiskeby
Station’
[ 27 ]
The Fiskeby Station {1st
visit}
Notes:-
(1) It was possible to visit
here from the map a LONG time ago and no ‘harm’ would have been done!
However, then, nothing would have advanced the game, whereas now
very much more can be achieved.
(2) I personally found this
location one of the most confusing to maneuver… I don’t know why since
it’s much more ‘open’ than some others.
I found myself going around in circles very frequently.
Hopefully this will not be the case for other players :)
.
*****
Explore the area fully and see if you can open any of the several doors.
There are a half dozen or so.
*****
Most doors are locked and don’t ‘react’… and
I think that even Carol gets a bit fed up trying since she exclaims rather
indignantly when approaching one door, “I’m not even going to try that
door”!
*****
However, one door only exhibits the gearwheel icon. This means that you can use an inventory object on
it… but nothing in inventory may work!
*****
Look around and find an extremely old latrine.
*****
Inside there are a trio of crude primitive abandoned toilets.
*****
You can enter 2 of them and ‘look around’… but there’s nothing of
importance in either.
*****
However, you can look inside the middle one through a gap in the shutters.
*****
This middle toilet only also exhibits the gearwheel icon. This means that you can use an
inventory object on it… but nothing in inventory may work!
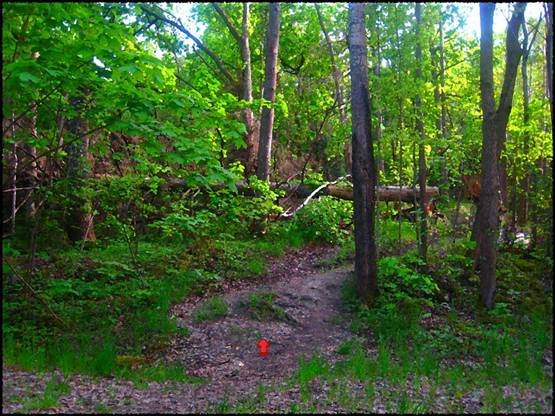
***** Look around all
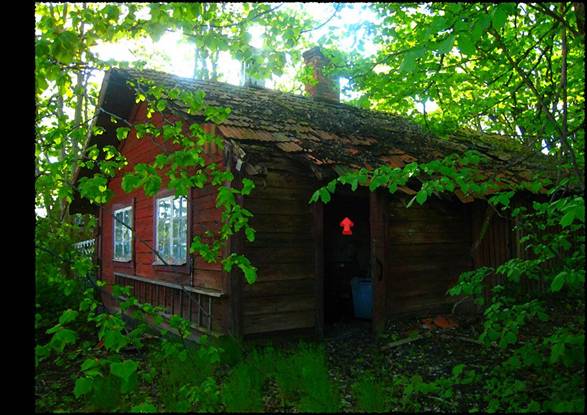
of the grounds until you find a brown colored outhouse.
See the view below.
*****
Enter and have a good look around.
*****
Look at and pick up the rusty key there… You may possibly have trouble
finding it ---
If so:-
Notice a 1954
calendar featuring a nude model hanging on a wall.
Look at the very
alluring female illustration… Carol expostulates “This
could only happen in
It’s to the right
of a door.
The rusty key is
also hanging on that wall… but on the other side of the door.
*****
Return to the abovementioned only door which can be
opened.
*****
From inventory, use the rusty key to open that door, and enter into a
room.
*****
Look around the room, find a cabinet, and open it.
*****
Look inside the cabinet.
***** On
the middle shelf, notice an old bottle of Bourbon, and take it.
*****
Look at the bottle in inventory… there is something inside it.
*****
Try to get it out! You
can’t (easily).
*****
In inventory, use the modified coat hanger on the bottle of Bourbon, or
vice versa, to extract the letter inside.
*****
In inventory, read the letter from a doctor to Mr. Nyman and pay very
good attention to the accompanying note.
*****
Leave the room.
*****
Return to the middle toilet (mentioned a little way above).
*****
From inventory, again use the rusty key to open the middle toilet door.
*****
Look into it and try to fish something out.
Carol understandably remarks “I’m NOT putting my hand down there!”…
ugh --- gross!
*****
From inventory, use the (pronged) poker to get something… but Carol
says “It’s not sharp enough”.
*****
Inside inventory, use the file on the poker (or vice versa) and obtain a
sharp poker.
*****
From inventory, use the sharp poker to fish out an unfinished letter.
*****
Read the unfinished letter to Elvira… Carol mentions “Gusum, didn’t
Stina use to live there?”.
*****
Exit the latrines.
*****
Return to the brown
colored outhouse… see the view just above.
*****
Enter the outhouse again.
***** Look around and
see a room with a dark entrance.
*****
Enter into the darkness… you can’t go any further since it’s
impossible to see anything.
*****
From inventory, use the bicycle lamp to explore.
*****
See a light brown colored box, and zoom in on it.
*****
Use the 4 orange colored buttons to open the box…. If you have any
troubles:-
In inventory, look again at the accompanying
note which you pulled out from the Bourbon bottle.
What do those
numbers indicate?
Presumably the 1, 2,
3, 4 refer to the orange colored buttons from left to right.
What about the other
numbers 3, 4, 2, 1 ?
They supply the
numbers of clicks.
So:- From left to
right, click the first button 3 times; the second button 4 times; the third
button twice; and the fourth button once only.
*****
Take the memo from Elvira to Erik.
*****
Close the box.
*****
Exit the whole of the Fiskeby Station area.
*****
On the map, choose the ‘Stina in the Store’ location, and go there.
[
28 ] Stina in the Store
{3rd
visit}
*****
Enter the store.
*****
Talk to Stina, and exhaust all dialog options.
*****
Exit to the map and go to ‘The Gusum Factory’.
[ 29 ]
The Gusum Factory
*****
Enter the factory… No way --- the whole place is closed and locked up.
*****
Exit to the map and go to Carol’s ‘Home’.
[
30 ] Home (Carol Reed’s apartment) {3rd
visit}
*****
Listen to phone call from Jonas
*****
He suggests that Carol meets him at the allotment.
***** Exit ‘Home’, and on the map go again to ‘The Allotment’.
[
31 ] The
Allotment
{2nd visit}
*****
Talk to Jonas … exhaust all dialogs.
***** Exit the ‘Allotment’, and on the map go again to ‘Anders Borg’s Apartment’.
[
32 ] Anders Borg’s Apartment {2nd
visit}
*****
Enter the house and use the
elevator to go upstairs… as previously, see [ 4
].
*****
Enter the apartment and go to the
kitchen.
*****
Open the refrigerator.
*****
Take the
perished food… impossible!
*****
Look at and take the
lavender-scented bin bag.
*****
Open the refrigerator again.
*****
From inventory, use the
bin bag on the
food… obtain a stinking bin bag.
*****
Leave the
apartment.
*****
Use the
elevator and go downstairs.
*****
Leave the
house. You can’t… Carol says
“I can’t walk around with all this rubbish”.
*****
Look around the ground floor and see a green colored door.
*****
Enter the
door… it is a trash-storage room.
*****
From inventory, throw the
stinking bin bag into a
trash bin.
*****
Leave the trash-storage room and exit the house.
***** On the map, go again to ‘The Allotment’.
[
33 ] The
Allotment
{3rd visit}
*****
Talk to Jonas … exhaust all dialogs.
[
He also invites Carol to his house in the country for a vacation!
:-) ].
*****
Exit onto the map and go to the new location ‘Leonard Kohler’s Home’.
[
34 ] Leonard
Kohler’s Home
*****
Talk to Leonard … exhaust all dialogs.
*****
Pretend to consider his not too subtle sexual ‘advances’, and obtain the key
to ‘The ***** Gusum Factory’.
*****
Exit onto the map and go to the ‘Gusum Factory’.
[ 35 ]
The Gusum Factory
*****
Walk forward only (quite a number of times) until you
can’t go forward any further.
*****
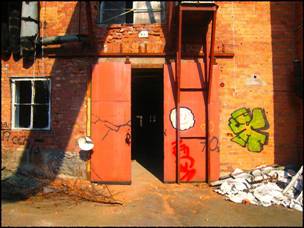
Move ‘around’ 3 times and enter the door as shown on the graphic below (left
hand side).
*****
Look for a dark area.
*****
Find a hammer.
*****
Take the hammer.
*****
Exit that shed and enter the one directly opposite.
*****
Find and zoom in on a white coil of wire cable… you can’t do anything with
it (at present).
*****
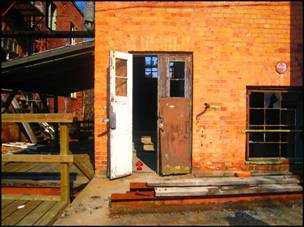
Exit that shed and explore further. Enter
the door as shown on the graphic just above (right hand side).
*****
Walk up the steps.
*****
Open the double doors (they are a very light grey color, with 2 brown handles).
You can’t do that!... Carol exclaims “Something is blocking the
door”.
*****
So just carry on walking up until you reach the very top… on the roof.
*****
Move around and view a machine and zoom in on it… Carol says “It’s no.
132”.
*****
Zoom out again.
*****
From inventory use the hammer to smash the glass next to that machine --- twice…
and take a shard of glass.
*****
Return to the previous door i.e. the one where you found the white coil of cable.
*****
From inventory, use the shard of glass to cut off a piece of the very thick
cable.
*****
Return to the previous door and again walk up the stairs to the roof.
*****
Go to the place where you smashed the glass.
*****
From inventory, attach the piece of very thick cable to a strong metal strut
there.
*****
Climb down to the hall below, which you couldn’t enter previously (its door
being blocked!).
*****
You alight in front of a large machine, and zoom in on it.
*****
“Open” the machine! ………. In
case you have difficulty:-
In
inventory, look at the note from
Elvira.
Note
the 6 circles which apparently represent the 6 hefty bolts.
From
inventory, use the adjustable spanner to open the bolt marked ‘1’.
From
inventory, use the hammer to bang the bolts marked ‘2’; ‘3’; ‘4’, in
that correct order.
*****
Take the VITAL Birth Certificate of Viktor Jonas Wallin.
*****
On the certificate, look at the father’s name… Carol says “That’s
the owner of the Gusum factory!”.
*****
Climb the cable back up to the roof… Carol expostulates “I’m not going
back that way”.
*****
Exit via the door.
*****
There’s a stiff bolt there… Carol says “I can’t move it”.
*****
Search the floor until you find pair
of pincers.
*****
Pick up the pincers.
*****
From inventory, use the pincers to open the bolt.
*****
Open the door and leave.
*****
Exit the building.
*****
OH NO
!!! A cut scene… Carol sensibly
follows the blackguard’s instructions exactly, in order to avoid getting hurt.
*****
Now, according to threatening instructions, use the cable to exit from the roof.
*****
Open the door again (the bolt has already been opened).
*****
There IS one more job you can do whilst you’re at
the ‘Gusum Factory’ but it’s not essential just yet!
(If you need to save a very little time, look at section [ 41 ], further on!).
*****
Leave the whole ‘Gusum Factory’ area.
***** On the map go again to ‘The Salt Field Shelter’.
[
36 ] The Salt Field Shelter
{2nd
visit}
*****
The supervisor gives Carol a
letter which arrived for Viktor Wallin.
*****
Open it and examine the
contents… it’s a bill for $39.00 from the Skandia Bank.
***** Exit ‘The Salt Field Shelter’, and on the map go again to ‘The Skandia Bank’.
[ 37 ]
The Skandia Bank
{3rd visit}
***** Repeat what you did in section [ 23 ] .
***** Now that you’ve deciphered the code (1, 9, 7, 2), enter it using the keypad.
***** Do whatever you can inside the safe deposit room.
***** In inventory, look carefully at the cushion… notice that it has been sewn up (and probably cut open previously!
***** Maybe there’s something important inside it?
***** In inventory, use the shard of glass to cut open the cushion (or vice versa)… and obtain a safety deposit key.
From inventory, using the safety deposit key, open the appropriate deposit box.
***** Apparently no. 1757.
***** Remove the Last Will and Testament of Viktor Wallin.
***** Exit ‘The Skandia Bank’, and on the map go again to ‘Richard Svensson’.
[ 38 ]
Richard Svensson {6th
visit}
***** Until now, whenever Richard is not there, Carol rings the front doorbell and then exclaims “He doesn’t seem to be home at the moment”.
This time, the janitor sees you and tells you that he’s not there and why, but nevertheless somebody is moving around in there.
***** Use the door handle and enter Richard’s apartment.
*****
KO! Carol is knocked senseless and locked up in the bathroom.
***** Look at the sink and then zoom in on it.
***** ***** Notice the sink’s drain.
***** From inventory, take the modified coat hanger and fix it into the drain.
***** From inventory take the hammer and hit the modified coat hanger hard making it an ‘even more modified coat hanger’.
***** From inventory use the ‘even more modified coat hanger’ on the keyhole of the bathroom (as a picklock) and unlock the door…but it still isn’t completely free!
***** From inventory take the passcard and slide it between the door and the doorframe.
***** Exit the bathroom… Carol is now free.
***** Move around carefully and see Leonard Kohler kneeling on the floor searching for something.
***** Skirt him carefully (otherwise he will attack you) and search the rest of the house for a weapon.
***** In one of the rooms you will see a skateboard.
***** Pick it up.
***** Return to the intruder… Carol exclaims “That’s Leonard Kohler”.
***** Carol returns to Kohler and QUICKLY knock him out… before he realizes that she’s there!
***** If you don’t succeed you will immediately obtain a quick message “Try Again”. You may have to try a few times, but it’s not too difficult to succeed.
***** You have to very quickly approach him very closely, grab the skateboard from inventory, and bash him on the head with it.
***** Whilst he is lying on the floor stunned, take his wallet and look at his Company and office details.
***** From the wallet, take his passcard.
***** Exit ‘Richard Svensson’, and on the map go to the new location ‘Norrköping Police’.
[ 39 ] Norrköping Police
***** Try to enter the Norrköping police station.
***** No go ! Carol says “There’s no time for that now”.
*****
Exit ‘Norrköping Police,
and on the map go to the new location ‘Leonard
Kohler’s Office’.
[ 40 ] Leonard Kohler’s Office
***** Apparently there is no obstacle to entry now that you have Leonard’s passcard.
***** Walk straight ahead as far as you can go.
***** Turn right and enter his office.
***** Zoom in on a cabinet with 5 grey buttons on top.
***** Open the cabinet………. If you have any trouble:-
This puzzle is in a
way slightly similar to “Simple Simon”… but can be solved more simply:-
You
have to press 1 SUITABLE button and hear 1 click.
Then a 2nd suitable
button and hear 2 clicks. Then
a 3rd suitable button and hear 3 clicks… and so on!
Spoiler:-
The order is as follows:- 3;
5; 2;
1; 4.
***** The
top drawer opens.
***** There is some sort of false bottom to the drawer.
***** Open it.
***** See a note protruding from underneath.
***** Retrieve the note.
***** Also there is the original of Viktor Wallin’s birth certificate.
***** Take the birth certificate.
***** Read the list that Leonard has made… the dirty jobs he has done.
***** In particular, observe the very last item on that list.
***** As you exit the drawer, notice the battery there.
***** Take the battery (you can actually leave this till a bit later, when you may need it!).
***** Notice the leaflet with info on a pretty deadly poison!
***** Returning to the sentence just above…i.e. “In particular, observe the very last item on that list”.
You may have acquired the essential item previously whilst you were finishing off section [ 35 ].
If so, skip the next section [ 41 ] and go straight to [ 42 ].
*****
Exit Leonard Kohler’s office and workplace and return once more to ‘The
Fiskeby Station’.
[ 41 ]
The Gusum Factory
{2nd
visit}
*****
As mentioned previously, you may already have completed this section…
in which case of course you should not repeat it!
*****
As described in section [ 35 ],
enter the door as shown on the graphic in that section (on the right hand side).
*****
Immediately turn to the right.
*****
Enter the door there and turn to the left.
*****
Notice the crowbar on the floor… that was presumably the weapon that was used
to threaten Carol, and was then dumped on the way out.
*****
Pick up the crowbar.
[ 42 ] The Fiskeby Station
{2nd visit}
***** Look around until you find the earthworks (near a small yellow house)…..see the view below.
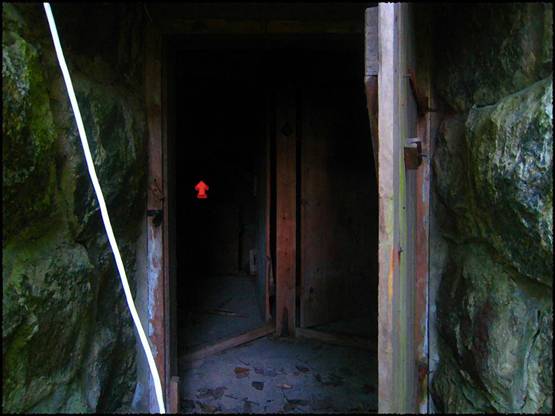
*****
Go inside and see a dark entrance.
*****
Enter into the darkness… you can’t go any further since it’s impossible to
see anything.
*****
From inventory, use the bicycle lamp to find your way around.
***** Oh dear! Carol says “The battery is dead” (If you look at the lamp in inventory it says “Non-Working Bicycle Lamp”).
***** In inventory, put the (new) battery into the lamp, or vice versa.
***** Use the (now working) bicycle lamp and look for a brown chest.
***** From inventory use the crowbar to open the chest.
***** Read the pathetic letters which are inside (and weep a few tears for the unfortunates L).
THIS
IS THE
END OF
THE GAME
!!
The whole case is fully tied-up through a series of characters who
explain and amplify what happened and why, leaving no loose ends.
Finally, the aftermath of the story unfolds with what happens to all of the characters after the criminal is apprehended, and the excitement dies down!
CREDITS
:-
If you have the patience, read
them (including
the game’s “Creative Consultant” who wrote this walkthrough!).
EASTER-EGGS
:-
There is one only. It seems
to be very difficult to find.
See if YOU
can discover it!!