|
There
should be no need to use this walkthrough since there is a very sophisticated
& detailed hint system built into the game itself! (It is fully described
both in the tutorial and the manual.)
It has been excellently and almost uniquely devised for a non-linear
game so that the player can get help at EVERY stage of the game without
revealing future gameplay. ****** But if you so desire --- carry on ! ****** FOREWORD
{A}
This walkthrough describes ALL the actions which you must take
in order to succeed, together with a relatively small number which
are not essential to completing the game. N.B. The game
contains quite a few red herrings. However,
please dont use this walkthrough unless you absolutely have to.
Some aspects which are not absolutely imperative have been omitted.
A lot of these are interesting and provide much of the background
story to the game, and particularly to the fascinating (and artistic)
character, scenery and history of Norrköping
a relatively small
town in {B} Warning:- The main purpose of this game is to examine items, interview people, view the interesting sights and scenery, and generally act the tourist, etc. . If you simply take this walkthrough in your hand and follow exactly what to do and not to do, you can probably finish the game fairly quickly. However that would completely defeat its whole purpose! {C} The
walkthrough does not do justice to The Colour of Murder! A
very great part of the interest and beauty of the game is wandering
around through the vast number of locations, views, and residences
There are actually so many that Im pretty certain that I missed a
few ! :~)
There is quite a lot of interesting material in Norrköping,
a small but quite important city whose population is a little under
100,000 and whose original roots date back to the 14th century, or
earlier! {D} This is a first-person game and much
of the intricacy and pleasure lies in browsing around
and as aforementioned
there is a lot of that. I personally frequently
got lost looking for some location or object (even occasionally
inside a residence!), and sometimes after finding it, lost my way
again on returning. to finishing
the game. {E} TCoM
does not contain too many stand-alone puzzles and those included
are generally not too difficult. However there IS one main puzzle for some players which runs
right throughout the game. It
is the necessity to ramble around (maze-like) without losing ones
way and getting frustrated due to this.
In general, the player is only told where to go, but not exactly how to get there, or even how to move around when actually there! Where this is somewhat more tricky, simple descriptive hints are given to help in orientation. But there are a very few locations where this may not be sufficient for some players. In those few cases this walkthrough contains instructions such as:- Move right twice (R x 2); then move
forward (F); then left three times (L x 3); then move forward five
times (F x 5); and finally move right (R)again. {F} On entering every new location, it is highly advisable to browse
around as much as possible in order to explore the general layout.
However, the walkthrough never tells you explicitly to do this! {G} You should most certainly
NOT have to follow the same order of accessing
locations as described in this walkthrough since the game is
VERY non-linear. There are a VERY GREAT number
of permutations of routes, and it is most unlikely that two players
will follow exactly the same itinerary.
In addition it is most likely that this walkthrough is not
the best or even optimum route to play the game (and finish it completely)! Some locations of course will not
appear on the map until you have completed certain tasks, and so a
particular order is sometimes obligatory.
Other than this, you are free to visit (&/or revisit) as you wish
! {H} There
is no need to describe ANY of the mechanics &/or interface of
the game. It is all contained in the Manual which is to be found
in the TCoM folder on your Hard Disc (after installing of course),
and also as a shortcut in the same program group as the installed
game. {I} There is only one extremely short sequence where you have to act rather quickly, but if you do not succeed you are returned immediately so that you can try as often as you need. There is no so-called bad language or adult material. It is all first person and mouse driven point & click. There are full (and excellent) English subtitles for ALL speech. {J} As in most games, it is easy to
make a wrong or redundant move! So it is advisable to save
frequently. There
are over 100 save-slots
in case anybody needs that many!
Since each save is small, saving and loading is very rapid,
presenting no delays to progress. N.B. There
are absolutely NO dead-ends or crashes in the game! {K} EVERY
TIME you obtain items, they appear in your inventory. Its always worthwhile observing each
new inventory item by right clicking on it to get an excellent greatly
enlarged picture of the item together with a very brief
description of it. N.B. It is imperative to view, and sometimes to manipulate, some of the inventory items in close-up to complete the game. {L} There
are no instructions in the walkthrough to close drawers, cupboards,
cabinets, etc since the game ensures that you cannot continue if you
do NOT!. {M} There
are a number of puzzles in the game.
Wherever there is an outright spoiler, I have inserted it in
smaller print and a light green color that is not TOO easy to read,
as follows:- Spoilers
are inserted like this
I
have done this deliberately since many players do not want to see
spoilers unless absolutely essential. WALKTHROUGH All objects which are taken & used from the inventory are written in bold underlined blue. If you are not too acquainted with this type of Quest-Adventure game, play through the short tutorial which will familiarize you with the controls and interface. Otherwise… skip it!
***** There are a few items of interest to
look at
but not to use. ***** There is nothing to do there at present. ***** Exit to the map.
[ 2 ] Stina in the Store {1st visit} *****
Enter the store. *****
Talk to Stina. ***** Exit to the map.
[ 3 ] The
Allotment {1st visit} ***** Locate the bright blue shed. ***** Open the door. ***** Take the Gum boots. ***** On a bench, read the note to Carol from
Willy. ***** There is a red hut with a white door
Willys shack. ***** Knock on the door. ***** Talk to Willy and exhaust all dialog
options. ***** During the course of discussion obtain an Envelope (which came from Adrians trash) addressed
to Harald Lund and a Key
to his son Adrians apartment --- also receive Adrians address, and
hear about a week old murder. ***** Exit to the map.
[ 3
] ***** ***** Propped up against a table lamp is a work
payment sheet from the Zodel Moral Mission. ***** Look at it. ***** Enter the bathroom. ***** On one of the open shelves, next to a basket of clothes, is a membership
card for the Maximum Paintkillers, the Norrköping Paintball
Club, in the name of Adrian Vinkelman with a photograph. ***** Enter the kitchen. ***** Open a white drawer (below the microwave
oven). ***** Read the report Murder in This is the impetus for the whole game. ***** Turn the report over and read the other
side. ***** Exit the kitchen. ***** Exit ***** On the map notice THREE new locations.
[ 4 ] The
Theatre Workshop {1st visit} ***** When entering the workshop you meet a
woman who is keeping an eye on the place whilst everyone is on vacation. ***** Talk to her and exhaust all dialog options. ***** At the end of the above dialogue you
are automatically inside the empty theatre workshop. Note the two baskets containing brown
folders near the left side of the screen and to the left of a red
fire extinguisher. ***** Look around the ground floor before going
upstairs. ***** Go to the abovementioned pair of baskets
on a wall --- ingoing and outgoing. ***** However, since the workshop is quite
large, you may need some help. ***** Pay special attention to the ingoing
basket and examine close-up --- listen to what Carol has to say. ***** Read the note hidden behind it (the brief
two lines handwritten on white paper and initialed S). ***** Locate the spiral
staircase. ***** Read the notice at the bottom of the
stairs Memorandum and phone list. ***** Take the Memorandum. ***** Note one of the phone numbers - that of Stefan, the transport person. ***** Climb the spiral stairs and examine the
upper floor. ***** Locate an orange coloured double chest
of drawers
with 6 drawers on the left side and 4 drawers on the right
side. ***** Open one of the drawers - the third one down
on the right side. ***** Grab the birthday card with a Self-taken photo on it and examine it. ***** Make your way down the spiral
staircase, turn completely round (180 degrees), walk forward once,
and turn left. ***** Concentrate on a box with three symbols
on it. ***** By clicking each one they rotate exposing
a different symbol. ***** In order to open the box, each of the
three symbols has to assume a specific shape.
Since each symbol can assume 5 shapes (the same 5 for each
symbol), it is possible to solve this puzzle the hard way by trying
every one of the permutations until by chance you hit upon the correct
one. This can be tedious since
there are 5 x 5 x 5 = 125 possibilities but if you go about it in
an organised fashion it should be possible.
However there is a much better and quicker way (indicated by
a broad hint):- In inventory, look again carefully at the Self-taken photo mentioned above. Specifically observe the image of the three
symbols in the mirror behind and to the left of the photographer.
Remember that everything seen through a mirror
undergoes lateral-inversion;
i.e. everything on the right appears on the left,
and vice versa. So the correct
orientation is
. \
X I. ***** Now you can open the box: So do so using the handle on the middle of the
right side. ***** Take the (lower) Key from theatre workshop. ***** Keeping on the ground floor, go to the
computer and printer. ***** However, once again, since the workshop
is quite spread out, you may need some help. If so:- From the very first photo inside the workshop,
proceed as follows R, F x 3, L, F, R, F x 2, L, F, R, F x 5, close-up. ***** Alongside them notice a box of tea bags
and look inside. ***** Take the Extra key, the Key from tea package. ***** Look around the ground floor until you
get to a white door with a fairly large dirty splash of paint which
has dripped downwards. If you miss it, it is in the same
area as a wall with three posters on it, the middle one being a representation
of Napoleon
and underneath about three dozen tins of paints. ***** Open the door and enter. ***** You cant do anything (as Carol notes)
since its dark inside. You
need some illumination. ***** So exit the door. ***** VERY close by is a dark
grey door: Go to it. ***** Look at the keyhole
you see a gear icon
indicating that something is needed there. ***** Use the Key
from theatre workshop. ***** Open the door and enter. ***** Investigate inside and find a fuse board. ***** Examine the fuse board and notice that
the left two fuses are live (red lights) but not the right fuse. ***** Press the switch beneath the right fuse
and it is now also live. ***** Leave that room. ***** Return to the dark room mentioned just
above
it is now lit up --- apparently the inoperative fuse had turned
off the light in that room. ***** Look around inside and see a letter from
somebody called Iris to Harald on a filthy pair of sinks, propped
up against a tin. ***** Read the letter. ***** Leave the room and leave the Theatre
Workshop.
[ 5 ] The
Zodel Moral ***** Read the green brochure (alongside the
newspaper). ***** The Zodel Moral Mission representative
appears and Carol talks to him. ***** Exhaust all dialog options. ***** Exit the Zodel Moral
[ 6 ] Iris
apartment {1st visit} ***** IMPORTANT NOTE:-
You must have finished at the Zodel Moral Mission, as described above.
before you can access Iris apartment. ***** If you try to enter the front door, you
cant
as yet. ***** Go to the call panels at the side of
the door. ***** Enter the correct code to contact Iris
since
her apartment is apparently #2, press the buttons A and then 2. ***** Iris tells you to enter. ***** Talk to Iris and exhaust all dialog options. ***** You automatically exit Iris apartment.
[ 7 ] Haralds
apartment {1st visit} ***** Enter the building. ***** Look at the apartment door marked Harald
Lund in close-up. ***** Unlock the front door using the Key from tea package and enter the apartment. ***** Inside, close to the front door look
at the envelope on the floor. ***** Open the envelope and read its contents
--- a boat space rental agreement addressed to Harald Lund from
the Calibri Marina. Carol remarks,
So he owns a boat!
. ***** Continue inside and view a large full
screen 3 x 3 coloured matrix. It
is a puzzle; but cannot be solved until much later on. ***** Underneath this, open the brown cabinet. ***** Take the test tube from there. ***** Nearby, on a red table, is a note. ***** Read the note. It is from Rebecca to Harald, requesting overdue
rent for a fortnight. ***** Exit Haralds apartment.
[ 8 ] Home (Carol Reeds apartment)
{2nd visit} ***** Go to the kitchen and use the telephone
there. ***** Make a phone call to the delivery man
if you dont know his
number, look in your inventory at the list you picked up from the
theatre workshop (as described above) --- it is 187795. ***** Exit Home.
[ 9 ] Three
Princes Alley {1st visit} ***** Examine the alley
Carol exclaims So
this is where the murder took place. ***** Find a red candle. ***** Snatch it. ***** Exit the Three Princes Alley.
[ 10 ] The
Calibri ***** Get onto the boat. ***** There is a very tough blue canvas protection
preventing entry. ***** There is a zip in this canvas
open it. ***** You cant Its stuck. ***** Ever heard of candle wax? Use the candle on the zip to loosen and free it. ***** Enter the boat. ***** Search around the cabins fore and aft. ***** Find a note from Dennis to Harald concerning
the ph of some water. On
the note is a piece of yellow litmus paper to test ph - i.e. acidity
or alkalinity of liquids. ***** Take the litmus paper. ***** Keep looking around and take a boat hook. ***** Continue and youll find a fish hook - take it also. ***** Exit the yacht and the Calibri Marina.
[ 11 ] Haralds
apartment {2nd visit} ***** Inside the apartment go to the semi translucent
round green plastic box with a key inside. ***** Use the fish
hook to open the box and
take the Key from Haralds apartment
N..B. You do not use the fish hook on
the keyhole as you might think, but on the slit at the top of the
box when its standing up vertically. ***** Exit Haralds apartment.
[ 12 ] Haralds
attic {1st visit} ***** Still keeping inside the same building, turn around etc. and go up just a
few stairs to the door to Haralds attic. ***** Open the door you cant; its locked. ***** Use the Key
from Haralds apartment to open the attic door. ***** Enter and look around, keeping very close
to the door. ***** There is some brown paneling with a door
closed simply with a wooden rotatable latch. ***** Open the latch and look inside. ***** Its a junk room enter and see a large
round tin; its top half is green and bottom half red. ***** Open the tin and see the letters. ***** Read the top letter; its from Iris to
Harald. ***** Click on it and read a review of a fascinating
biography of Kurt Haijby who nearly brought the Swedish Monarchy
to an ignominious end. ***** Exit the junk room. ***** Walk a little further into the fairly
long corridor of the attic. On
the right side see another. door and latch
rather similar to the previous one it has the number 30 stencilled
on it. ***** Open the door, enter and look around. ***** Take the stepladder. ***** Exit the room. ***** Continue walking along the corridor to
the end and look around. ***** Take the fuse. ***** Turn round and walk all the way back
to the attic door and exit. ***** Exit Haralds attic.
[ 13 ] Haralds
apartment {3rd visit} ***** Enter Haralds apartment. ***** Go to the kitchen. ***** Get close to the refrigerator and see
a red/orange bowl on top. ***** Carol tries to get to it, but Either
the fridge is too high, or Im too short. ***** Step back and put the stepladder alongside
the fridge. ***** Now Carol can get to the bowl easily. ***** Look at and read the two
(following) papers that are inside the bowl. They are of great importance and contain serious clues. Take the Note from Haralds apartment. Take the Strange messages to Harald. Pick up the stepladder again. ***** Exit Haralds apartment.
[ 14 ] ***** Alongside the entrance to the living
room is a closet with a red coloured file. ***** It is on top of a high set of shelves. ***** Carol needs to get at that file she
cant, its too high up:- No way, it almost touches the ceiling. ***** Put the stepladder alongside the shelves. ***** Now you can take the file. ***** Read the contents it is a lease agreement
between Frejas Inc. and Adrian Vinkelman. ***** Remove the stepladder. ***** Exit
[ 15 ] The Trailer Park {1st visit} ***** Open the door to the trailer
you cant,
its closed from the inside. ***** Try the window
Carol opens it without
difficulty. ***** Climb in: Impossible, the opening is too narrow. ***** Look inside. Carol can see the inside
handle but cant reach it. ***** Use the boat hook to unlatch the door on the inside. ***** Close the window and leave it. ***** Go to the door and enter the trailer. ***** On the table are two notes
read them. ***** Lift the cover of the sink. ***** Read a biographical article about Kurt
Haijby. ***** Click on the article and read the unfinished
rather illiterate note. ***** Take the article about Kurt Haijby. ***** Close the sink cover. ***** Look around the trailer and open one
side of the sliding doors of a closet. ***** See a Screwdriver
and take it
This could come in handy. ***** Now open the other side of the sliding
doors of that closet. ***** See a Removable
Handle and take it. ***** Look for a closed closet. ***** Use the Removable
Handle to open the closet. ***** Look inside the closet --- a pair of
boots
Mud, and its still wet. ***** Leave the trailer.
[ 16 ] The
Allotment {2nd visit} ***** Talk to Willy and exhaust all dialog
options. ***** Exit to the map.
[ 17 ] The National Tax Board {1st visit} ***** Talk to the janitor and exhaust all dialog
options. ***** Carol wants to get into the tax board
office. ***** During the course of discussion the janitor
mentions that, for certain reasons, he would let her in if she could
find seven wild flowers in seven certain colours
and
remember, they have to be wild. ***** The janitor says that he already
has a green wild flower, and he gives her the List of flowers to
get for the janitor There
are six of them
red, white, yellow, pink, blue, purple. ***** Exit to the map.
[ 18 ] The Docks {1st visit} ***** Look around --- its not a large area. ***** Find some white flowers (some are for
picking
others not). ***** Pick some. ***** I think Ill take another one Carol
says, and obtains a white flower and also some white flowers. ***** Leave the docks.
[ 19 ] The Lavender Brook {1st visit} ***** Go forwards --- only 7 (different) directional
arrows
if you go further you will come across the brook and two tunnel
openings. You need to go there
eventually - but later and not now). ***** See some brightly coloured wild flowers. ***** Take a close-up look at one gorgeous
pink flower. ***** Pick that flower. ***** Exit to the map.
[ 20 ] Stina in the Store {2nd visit} *****
Enter the store. *****
Talk to Stina and exhaust all dialog options. ***** Exit the store. ***** Notice that there are now two new locations
on the map.
[ 21 ] The Milestone {1st visit} ***** Take a step or two forwards. ***** View the milestone
Carol exclaims I
cant see what it says. 1755 something. ***** Immediately behind the milestone are
some coloured wild flowers. ***** Take a close-up look at the brilliant
blue flowers. ***** Pick the flowers. ***** Exit to the map.
[ 22 ] The Paintball Hall {1st visit} ***** Walk forward several times until you
get close to the tall ladder alongside the actual paintball hall itself. ***** Turn left and youll see some coloured
wild flowers. ***** View the flowers close-up. ***** Pick a purple
flower. ***** Enter the open door to the paintball
hall. ***** Search around the hall. ***** Approach a scattered group of about a
dozen discarded car tires. ***** Look at and grab some headlights - For the night games, maybe?. ***** There is a tin of paint on the ground
and alongside it is a can of spray. ***** In front of the can, see and pick up
a blood paint capsule - ----- its filled with a very strong red paint. ***** Leave the paintball hall. ***** Exit to the map.
[ 23 ] The Zodel Moral ***** See a pair of scissors on the table to the right of the green
brochure (alongside the newspaper). ***** Look at and take them. ***** Again the Zodel Moral Mission representative
appears and Carol talks to him. ***** Exhaust all dialog options. ***** Exit the Zodel Moral
[ 24 ] The
Allotment {3rd visit} ***** I
could pick some flowers here, but they wouldnt be wild then says
Carol. ***** Go to a wide rather scruffy white door. ***** Open the door and enter. ***** Make a close-up view of the tin can on the floor. ***** Using the screwdriver, open the tin can. ***** Put
the blood
paint capsule into
the open tin. ***** Cut the capsule open with the scissors. ***** Dip the white flower into the red paint in the tin. ***** Hey; now youve got a red flower. ***** Close the tin. ***** Exit to the map.
[ 25 ] The Petroglyphs {1st visit} This is a location full of objects of
historical and archeological interest.
You dont actually have to view everything there, but
it would be a pity to rush and not take your time to see and read
about these unique items
not limited to In all there are 6 stands with genuine
pictures of petroglyphs with textual descriptions and explanations. There are also about a half dozen photographs
of actual petroglyphs in that area. ***** Before you start your tour, take another
look in inventory at the Note from Haralds apartment.
***** Look around the whole of the petroglyph
location as mentioned above. ***** In particular examine the stands with
the following information:-
***** Finally take another look in inventory at the Note from Haralds apartment.
--- Note the significant difference!
***** Exit to the map.
[ 26 ] Stina in the Store {3rd visit} *****
Enter the store. *****
Talk to Stina and exhaust all dialog options. ***** Stina asks for a favour (for a change!).
If youre going to visit the Industrial Park, you can look
for my earring. Stina dropped
it last Christmas, and it fell down a grating in the waterfall observation
(very) large pipe. ***** Exit the store ***** Notice that there is now a new location
on the map
[ 27 ] Industrial Park {1st visit} ***** Search the area for some wild flowers ***** You'll find some near to the catwalk ***** However, since the area is quite large, you
may need some help ***** See the flowers and take a close-up look. ***** Take
some yellow flowers. ***** Immediately reenter the park. ***** Search the area for some red water ***** There is a ramp leading down to a construction area in
the industrial park since the red waterfall is being overhauled. You can go down that ramp and then left to a
stream and get some from there. ***** However, once again, since the park covers
quite a large area, you may need some help. ***** Take the test tube and fill it with red water. ***** Exit
to the map.
[ 28 ] The National Tax Board {2nd visit} ***** Not far from the door see a memo on the
wall --- to Johanna from Lotta. ***** Read it and take it --- its a Message from archives. ***** Go to the far end of the room. ***** See a pile of hooks, slightly to the
left on the bottom shelf. ***** Pick up one --- Carol exclaims This
could be used for a lot of things. ***** Take the Screw hook. ***** To the right of these hooks is a pass
card belonging to Stephan Lundgren (alias our truly brilliant Swedish
Developer Mikael Nyqvist --- aint he something!!). ***** Turn over the pass card. ***** Read whats written there on the back. ***** Return to the door and alongside it see
a copying machine. ***** Take a close-up look at the copier. ***** Try to print something --- seems you
cant
the panel reads Load paper to continue copying. Apparently its out of paper. ***** So use the back of the abovementioned
message from archives
as a sheet of paper ***** Now you have paper you can print ---
but no; another obstacle
the panel reads Enter personal 4 digit
code. ***** If you havent already done so, turn
over the pass card. ***** Read whats written there:- ***** Maybe thats a clue to the missing code
The words
are:- Ivan ~ Xerxes ~ Victor. The
first capital letters of these words are I, X, V
in Latin
numbers thats 1, 10, 5 How about trying the
code 1105.. ***** Enter the code. Hey! it works. ***** You get a printed Archives list (on the other side of the Message
from archives). ***** Exit
to the map.
[ 29 ] The
Theatre Workshop {2nd visit} ***** Return to Haralds desk. It is where you got the key from tea package
in section [ 4 ]
(where the computer and printer are situated). ***** However, once again, since the workshop is quite
spread out, you may need some help:- ***** In front of the printer is a small pile of CD
cases --- take a good look. ***** Take the strange instruction. ***** Exit to the map.
[ 30 ] Industrial Park {2nd visit} ***** From the first photo inside the park go forward
quite a number of times until you can go no further. You find yourself in front of a building that
looks somewhat like an austere church but in actual fact was the Norrköping
heating station (note the tall chimneys). ***** Turn right and again make a number of steps forward.
You are now at a museum which recalls the period from about
the mid 19th to the mid 20th centuries when the foundries of Norrköping
were producing products from different metals
possibly the best in
***** Enter the museum and look around. Part of it is rather dimly lit,
the other part is very brightly illuminated mainly by the strong light
from large windows. ***** Go to the brightly lit part and search around
until you find a pair of pliers --- they are in front of a very large
window made up of a dozen substantial panes of glass. ***** Pick up the pliers.. ***** Now go to the darker part of the museum and get
to a section illustrating a lot of the excellent metal work, workers,
and foundries of Norrköping. ***** Look at the posters and read them, and particularly
a poster depicting the work of blacksmiths. ***** To its left there is a vise clamped to a bench
approach it and view it in close-up. ***** Close the vise by clicking on its handle. ***** Insert the screw hook
between the jaws of the vise. ***** Use the pliers
to bend the screw hook. ***** Take the bent screw
hook which you have made. ***** Leave the museum: You cant! You cant purloin an historical item (even in
a Quest/Adventure) from a national museum. ***** Return the pliers
to the place from which you took them. ***** Now you can leave the museum
so do that. ***** Exit the industrial park.
[ 31 ] Haralds
apartment {4th visit} ***** Enter Haralds apartment. ***** There are 2 doors facing Carol. The left door leads
to the bathroom/toilet. ***** Enter the right door --- You cant; its locked. ***** Look at the handle and keyhole. ***** Use the bent screw
hook to open the door and enter Haralds bedroom. ***** Go to the trash bin and look at it in close-up. ***** Take the Letter from
Haralds trash - Its not
100% certain, but it seems likely that it was written by
Harald himself and trashed.
***** Click on the Letter
from Haralds trash and see a brochure concerning Happy
Rentals Premium Membership
it is still in the trash can (and can
be read again). ***** Its
worth while remembering
anything of importance in that brochure particularly Haralds Birth Date
***** Open the closet.
***** Look at the pocket of Haralds brown jacket. There is something there. ***** Take a piece of paper with just two 4 digit numbers
on it --- Note from Haralds pocket.
The numbers
are 8591 and 1173. ***** Exit the closet. ***** Leave the bedroom. ***** Leave Haralds apartment. ***** Exit to the map.
[ 32 ] The
Theatre Workshop {3rd visit} ***** Go to the paint room. If you have difficulty in finding it, it is
the place Carol visited earlier on in section [ 4 ] ---
the white door with
a fairly large dirty splash of paint which has dripped downwards.
If you miss it, it is in the same area as a wall with three posters
on it, the middle one being a representation of Napoleon
and underneath
about three dozen tins of paints. If you have trouble getting there
the following may help - Keeping on the ground floor, go to Haralds desk (where the computer
and printer are) as you have done twice before i.e. From the very
first photo inside the workshop, proceed as follows R, F x 3, L,
F, R, F x 2, L, F, R, F x 5,. From
there it is easy R x 2, F x 4,
L. ***** Enter the paint room. ***** ***** Once you've opened the door, look at the International Color Chart on the wall
in front of you. ***** Arent there two familiar numbers there? - Look (in inventory) at the note from Haralds apartment. They are 101 yellow colour and 202 pink. Colour.. ***** Do you remember the puzzle box in Haralds apartment
- The above
2 colours appear on it. You cannot solve that puzzle yet, but will have to wait until a fair
bit later. ***** Beneath the chart are two large square open bins. ***** Look into the left bin and notice the
corner of a white envelope. ***** Open the envelope. ***** Inside it is a note read it. It is from somebody called Stefan describing
some sort of cache in a mountain somewhere (
.
in a small room with
a green door to the left
...in a box
). ***** The same envelope contains a key. ***** Pocket the key from envelope - it opens both the door and
the box. ***** Leave the paint room. ***** Then leave the theatre workshop. ***** Exit to the map.
[ 33 ] The National Tax Board {3rd visit} ***** It seems that Harald changed his name
so look
at the Archives list. ***** Apparently name changes are filed in the Tax
Office under section Fa. ***** Go to that section. ***** Now what was Haralds birthday? It was printed on that brochure concerning Happy
Rentals Premium Membership
it is still in the trash can in Haralds
bedroom (and can be read again --- see [ 31
]). ***** The
only thing that was worth remembering in that brochure was:- Haralds Birth Date
***** So look at the white card marked 23. ***** Take a file from that section. ***** Look at the file --- it is tied with string. ***** Cut the string with scissors. ***** Keep the string. ***** Examine the National Tax Board form for Harald Lund. ***** It seems that his original name was Harald Haijby. ***** Exit to the map.
[ 34 ] Industrial Park {3rd visit} ***** Go to the waterfall viewing area (The waterfall
of red water is not in operation due to renovations)
you passed it
on your way to the catwalk in [ 27
]. If you have difficulty finding it
Follow
the first half of the instructions in [ 27 ] approximately:- i.e. F x 8, R, F x 4, L, F x 6. ***** If you havent already done so previously, look
down close-up at the grating and see something down there. ***** It is the earring which Stina accidentally dropped
down there last Christmas. That must be Stinas earring.
see [ 26 ]. ***** In inventory, attach the string to the fish
hook or vice versa and obtain a string
with fish hook. ***** Fish the earring out using the string with fish hook
it is Stinas earring. ***** Leave the Industrial Park and exit to the map.
[ 35 ] Stina in the Store {3rd visit} ***** Talk to Stina, ***** Give Stinas earring back to her she thanks Carol etc.
[ 36 ] Haralds
attic {2nd visit} ***** Go to Haralds place but dont enter
his apartment. ***** Instead, enter his attic --- see [ 12 ]. ***** Walk along nearly to the far end, and
on the right side there is a door marked Clockwork Mechanism. ***** Open the door you cant its locked. ***** So, use the bent screw hook on the keyhole. ***** Enter the room. ***** Look around; amongst other things there
is a ladder leading upwards. ***** Climb up the ladder, and another one.
Carol exclaims I cant see anything up there
obviously its much
too dark. ***** Return down again. ***** Go to a fuse board. ***** Look at it closely. ***** Notice that one fuse is missing. ***** So plug in the fuse. ***** Again return to the ladder. ***** Climb up the ladders and view a large
standing clock mechanism. ***** Up there and in the vicinity is an
oil can, on one of the horizontal beams. ***** Take it. ***** Return down the ladder. (You can play a
few notes on the organ if you wish). ***** Go out of the Clockwork Mechanism
room. ***** Leave the attic. ***** Exit Haralds apartment house.
[ 37 ] The Docks {1st visit} ***** Look around --- its not a large area. ***** Go to the entrance of a cave
it is very
close to the location where you picked the white flowers in section
[ 18 ] . ***** The cave is closed with heavy locked
metal doors. ***** Look close-up at the doors, ***** Insert the key from envelope into the keyhole. ***** Open the door --- you cant Its stuck
--- So I guess Ill have to find another way in. (Dont move too quickly i.e. before Carol has
finished speaking!) ***** Go to the left and rear of the heavy
doors. Climb up a few stairs and keep going forwards. ***** You will find a rear entry (which was
probably illegally broken into at some stage). ***** Go into the rear entry and
walk in. ***** Its too dark to proceed, and Carol
cant see a thing. ***** Put on the headlights.
Now she can see reasonably well. ***** Go forward a couple of times and right,
and then forward again three times and then left, and see a hammer on the ground. ***** Pick up the hammer. ***** From where you picked up the hammer,
go right and forward as much as you can and notice the metal cutters. ***** Grab them. ***** Go one (only) step to the left, and you
will see a locked box. ***** Open the box you cant; you need the
key. ***** If you read the letter in the Theatre
Workshop ([ 32 ]
from
Stefan), it says that the same key opens the main doors and also the
box. ***** But that key is outside
in the main doors. ***** Exit the rear entry to the cave. ***** Make your way to the front doors. ***** Take the key --- you cant
its stuck
inside the keyhole. ***** Maybe you can push it out from inside
the cave. ***** Return to the rear entry and enter. ***** Go to the very end and view the inside
of the main doors. ***** If you have difficulty finding the main doors
inside the cave From
the time you put on the headlights - F x 2, R, F x 5, L, F,R, F, close-up. ***** Try to push the key out from inside
that doesnt work - you need something to push it out. ***** Use the oil
can on the keyhole --- still no go! ***** Bang on the oilcan with the hammer. ***** At last
it shoves the key out. ***** Again exit the cave through the rear
entry. ***** Go to the main doors. ***** Nearby you will see the key from envelope on the ground. ***** Pick it up. ***** Return to the rear entry and enter. ***** Go to the locked box which needs the key
as mentioned above. ***** Use the key
from envelope to open the locked box.. ***** Look at and read the letter from Harald
to Stefan, and the reply from Stefan to Harald. ***** Carol realizes that she got mixed up,
and what she thought was milestone was actually limestone (a simple
partial anagram!). ***** Leave the cave. ***** Exit to the map.
[ 38 ] Adrian's apartment {3rd visit}
***** Walk forward several times until you
get to the first door in the paintball hall. ***** Enter the door. ***** Turn left and look at the machine there
Carol says This must be the turquoise machine. ***** Look at it in close-up. ***** Open the latch impossible! I think
it needs some oiling. ***** Use the oil
can on the handle of the latch. ***** Now you can open the latch, so open it! ***** Use the boat hook on the open latch
to pick up a plastic bag with a note in it. ***** Read the note. Apparently, ***** Replace the note and the plastic bag. ***** Close the latch. ***** Leave the paintball hall. ***** Exit to the map.
[ 40] The Lavender Brook {2nd visit} ***** Go forwards several times. Now and then
you need to turn to the right when there is no forwards arrow. Eventually,
you will find two tunnel openings. ***** Im not going to jump into the water
in these shoes... Change into the gum boots. ***** One of the notes in ***** I cant even see the rats in here now.
Use the headlights to see better. ***** Go forwards several times until the tunnel
turns to the right. ***** Turn left and see a briefcase on a ledge
connecting the left and right tunnels. The case is attached to the
ledge with an iron chain. ***** Use the metal cutters to sever the
chain. ***** Pick up the briefcase and get a close-up
of it. ***** Click on the briefcase
again and it will go into inventory. ***** Exit the tunnel. ***** When in the open air again, right click
on the briefcase in inventory to get a close-up of it.
***** Remember what It was 127! right?
Enter the three digits into the numpad on the briefcase, and watch
it open. ***** The briefcase contains lots of money.
Look at the money and Carol says I think I should try to find ***** Exit to the map.
[ 41 ] The Trailer Park {2nd visit} ***** Open the door to the trailer
You will
find ***** Talk to ***** During the course of discussion obtain
a bucket. ***** At the end of the dialog, Carol is reminded
that it is Midsummers Eve. Weve learned from a letter on her kitchen
table that she was supposed to meet up with her friend Jonas in his
cottage today. ***** After the dialog, youre automatically
transported to
[ 42 ] The
Allotment {4th visit} ***** At the allotment, you meet Jonas, apparently
not in a very good mood. Exhaust all dialog options,
and his mood soon changes for the better. ***** Watch the barbeque cut scene.
[ 43 ] Stina in the Store {4th visit} ***** Enter Stinas store and ask here about
the limestone quarry that Harald mentioned in the letter in the cave. ***** Stina will give you directions. ***** Leave Stina and return to the map.
[ 44 ] The Limestone Quarry {1st visit} ***** Walk forward a couple of times until
you see some white stones to your left. ***** Walk up to the stones and then turn left.
Then, walk forward until you get to a small lake containing green
water --- amazing! That water is green alright!.
If you want to, you can look at the water in close-up, but
you cant do anything there yet. ***** Turn around and walk back one or two
steps. To your left, you can walk past the white stones. Go forward
several times until you see a man-made ledge to your right. ***** Look for a rope
its somewhere at the base of that ledge, and in the
middle.. ***** Pick up the rope. ***** Tie the rope to the bucket now you have a bucket with rope. ***** Go back to the green water and look at
it in close-up. Lower the bucket with
rope into the water, and get some green water. ***** Return to the man-made ledge where you
found the rope. Pass the ledge by walking forward as many times as
possible, until you get to an Exit icon. Turn to the right. Walk
forwards several time to get to the end of the ledge. Turn left to
see some indecipherable writing on the wall. ***** Remember what the note in Haralds apartment
said about a message being revealed by the rain on this particular
limestone wall. Use the green water on the wall, and the message will be revealed.
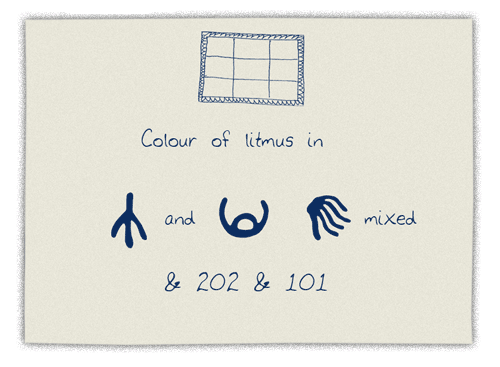
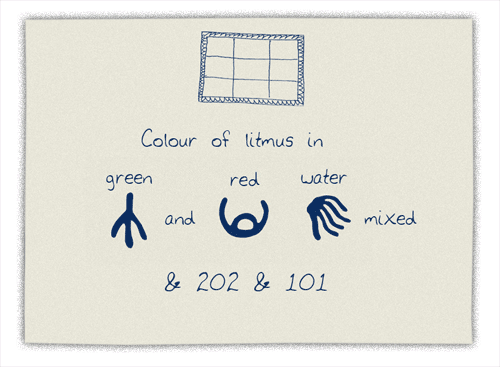
***** Look at the message, and Carol exclaims
Thats the night of the murder. ***** Mix the green water with the red water in the test tube, and get red and green water
mixed. ***** Dip the litmus paper into the red and green water mixed. The paper turns blue
(i.e. the water is alkaline
with a ph greater than7) ***** Exit to the map. (If you just turn to
the left from the message, and then continue forwards, you find a
very close exit.
[ 45] The Hedwig Church {1st visit} ***** Find the ***** Just before the main part of the church,
there is a storage room to the right. Find a reacher in the storage room,
and borrow it. ***** Go through the whole church (in which
the games creator Mikael Nyqvist and his lovely wife and co-worker
got married) and look at the beautiful windows. ***** Eventually, after passing the
altar, and then going to the left, youll find a back door. Exit the
church through that back door. ***** Once outside the church, there is a mobile phone lying on the ground to the left of the back door. Maybe Harald dropped his mobile phone here, if he was standing here waiting.. ***** Pick it up. ***** Go back towards the front of the church
- outside it. In the vicinity and to the right you will see the Three
Princes Alley. ***** Go to the alley, and Carol will note
that Iris apartment is close by. ***** Look at the mobile phone in close-up (by right clicking
it in inventory). ***** Maybe one of the codes found in Haralds
pocket [ 31 ] will work for the phone. Try
1173, and it will activate the phone.
***** Press the previous button, and learn
that Iris door code has been changed to 3395. ***** Exit to the map.
[ 46 ] Haralds
apartment {5th visit} ***** Go straight to the box with the 3 x 3 coloured matrix, which is close
to the bed in the living room. ***** You now have the three colours that are
referred to in the note you picked up in the bowl on top of the refrigerator
see [ 13 ] ***** Press the appropriate three coloured
squares on the box - pink,
yellow, and blue,
***** The box opens. ***** Look at and take the machine handle in the box. ***** Leave Haralds apartment and without
leaving the building go to his attic.
[ 47 ] Haralds
attic {3rd visit} ***** Enter the Clockwork Mechanism room,
and find the clock mechanism. View the mechanism in close-up, and
use the machine handle
on it. ***** Pull the handle twice, and a compartment
opens up right above you. ***** Remove the machine handle, and climb
the ladder just behind the clock mechanism to find a compartment. ***** Get something from there --- you cant
because its too high up. ***** Use the reacher on the compartment to get the contents. ***** Find and take the key. ***** Read the letters. ***** Go down and leave the Clockwork Mechanism room, ***** Exit to the map.
[ 48 ] The Hedwig Church {2nd visit} ***** You cant steal an object from a holy
place. Return the reacher to the church.
[ 49] Iris
apartment {2nd visit} ***** Go to the call panels at the side of
the door. ***** Enter the door code 3395 to open the outer door. ***** Use the key to the envelope in the attic
to open Iris door. ***** Once inside Iris apartment, locate a
drawer in her bedroom containing a key. Get the key from Iris apartment. ***** Open a cabinet door with the key from Iris apartment ***** Open the drawer in the cabinet and see
a letter. ***** Read the letter --- I know that handwriting.
Its that guy from the Zodel Moral Mission. It looks like
the ***** Try to leave the apartment from any of
the doors that lead outside. Ooops, it seems like Iris didnt go on
that trip after all. Shes just coming home! ***** You now have to exit the apartment from
the opposite door. But be quick, Iris will enter the apartment if youre not fast
enough
R x 2,
F x 2, click on the door handle!
Look at the ending, the Credits
and the EPILOGUE which completes the narrative.
|