|
Carol Reed Mystery # 8 Walkthrough by Len Green (lengreen@hotmail.com) February 2012
Carols home (1) Carol is having a
sleep-in, but has forgotten to turn off the alarm clock. Carol moans: Oh no, I forgot to turn off the alarm clock. Click on the alarm
clock to shut it off. Get out of bed and
go to the kitchen. Theres a wallet on
the kitchen table. Pick it up. Take the cash and
look at the card about the Lunda Wheel. Find your way to the
living room. Carols mobile phone is on a charger on the floor in a
corner of the room. Unplug the phone and
read the SMS from Carols friend Stina: Can you please drop by the kiosk? I have a favour to ask of you. Stina's kiosk appears on the map. Carol comments That message must
have arrived yesterday. Carol's mobile phone
is added to the inventory. Find Carols computer/TV
room. Pick up the lipstick beside the computer monitor, and find out
that its actually a ballpoint pen,
which is added to the inventory. Pick up the ballpoint pen refill beside the dolls house.
In inventory combine
the ballpoint pen refill with the ballpoint pen, and get a recently
refilled ballpoint pen. Carols allotment (1) Pick up the keys in the allotment from the flower basket. Use the keys to open
the blue shed, and grab the hacksaw
on the left wall. Take a look at the
rubber boat in the shed. Carol says: Stina gave me this rubber boat to use as a bird bath. I still havent figured out
if she was joking. Stinas kiosk Look at the notice
stuck on Stinas kiosk. Stinas home (1) Carry out the conversation
with Stina. Stinas attic appears on the map. Stinas attic (1) Find room 8 at the end of the corridor. There is a banana
box on a high shelf. When trying to grab it, Carol says: Im way too short. Take the toilet bowl in the same room. Place the toilet bowl
beneath the banana box to reach it. Pick up the strange photo and the medical
license from the banana box. Carol reads the text
on the medical license, and comments: That is Stinas grandfathers name. and There should be
more information about this medical license somewhere. Look at the lower
right corner of the license and see that the license was issued by the Norrköping Board of Medicine,
which appears on the map. There is also a metal box with numbers on in the banana
box. It cannot be opened at this stage. The Board of Medicine Talk to the clerk
at the desk. Repeat the question Can you please check for information about that medical
license again? When the clerk turns
to the computer, pick up the list on his desk. Use the pen on the
list and add Carols name. A new question comes
up, and the clerk will allow you to enter the archives. Look at the door with
the code lock. It cant be opened yet. Proceed forward and find the blue tin box. Look at it in close-up and
pick up a desk key from it. A jacket hangs to
the left of the shelf with the blue tin box. Walk to the other side
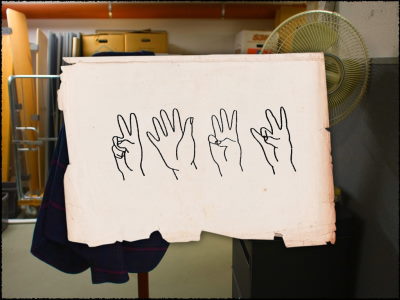
of the room to reach the right pocket of the jacket. Search the pocket
and find a drawing of 4 hands.
Find a grey metal
door which leads to another room. Examine the desks at the right side
of the room. One desk contains
some sticky stuff. Pick it up. At the end of the
room you will find a locked desk. Open it with the key from the blue
tin box. Pick up the sign language book.
The door with the
code lock can now be opened. The code is 2567. We are now inside
the actual archives. Read the paper inside
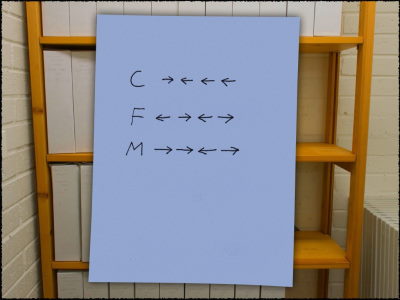
the green map on the table. There is a sheet of
paper stuck between the box files on the shelf by the wall. Look at
it. It has arrows relating to the letters C,F and M. We can now open section
M, using the information from the green map and the blue sheet of paper.
You need to turn the handle twice to the right, then once to the left,
and finally once again to the right.
Find box file 0460
and read whats in it. Carol comments: Maybe the doctor
worked at Broxtowe. Exit the archives
and engage in a new conversation with the clerk. The library appears
on the map. The library (1) Look at the right
shelf and find a book about the Broxtowe Psychiatric Institution for
the Criminally Insane. The John Milius Exhibition appears on the map. The John Milius Exhibition
(1) Look at the notice
on the door. It says: Closed
during summertime. Call 0011-46
28 66 for information. Look at the phone
in the inventor and click on the phone number. Henry Milius appears
on the map. Henry Milius (1) Talk to Henry Milius,
and get the key to the exhibition. The John Milius Exhibition
(2) You can now enter
the exhibition with the key Henry Milius gave Carol. Read the text about
Julian Milius on the green pedestal. Look at the painting
of a bird on the wall and read the text. Examine the calendar
on the same wall and read the text below it. Look at the article
about The Broxtowe Psychiatric Institution for the Criminally Insane. The Broxtow Psychiatric Institution appears on the
map. Stinas attic (2) Return to Stinas attic and punch in the numbers 06/06/35 on the metal
box which is in the banana box. The metal box opens.
Pick up the Famous
Swedish Criminals collectors' card with featuring Alfons Larson. Read the considerably
newer article that is under it. Broxtowe (1) Take a look at the
exterior of the institution. You cannot get very far before Carol comments:
No, I dont think
Ill be able to get in there. Besides, according to that newspaper article
its dangerous to move around in there. The The Go to the very end
of the interior of the hospital, and find a tile
on the right. Stinas home (2) Talk to Stina again. The first windmill and
the second windmill appear on the map. The first windmill Open the door to the
windmill. Look up through the opening leading to the second floor. Carol
comments: So
how do I get up there?. Pick up the orange
box (box with useless stuff) on the left. Place the orange box
on the red box and climb on it to reach the second floor. The ladder on the
second floor leads to another floor. Climb the ladder. As soon as you reach
the next floor look closely at the floor in front of you. Pick up the loop bolt. Yet another ladder
on this floor leads to the brake wheel. Climb the ladder and turn around
180 degrees. You will see something blue on the floor. Pick up the diskette. Carol says: Thats an old diskette. Whats that doing
in here? The second windmill Enter the windmill
and climb the ladder. Go to the inner half
of the top floor, turn around 180 degrees and look up. Below the enormous
brake wheel there is a small red pouch of some kind. Try to reach the pouch.
Carol says: I can't reach
it. Use the loop bolt
to get the pouch. The pouch contains
a rusty key to the Eastern windmill. There is a birds
nest on the floor. Pick up the ring from it. Carols home (2) Put the diskette in
her computer which stands on the floor in the computer/TV room. Carol
comments: Its
a 3.5-inch diskette. I still have one of those drives. Otherwise I wouldnt be able to play some of my older
games. Read the text displayed
on the monitor from the diskette. Carol says: So theres one more windmill. The Eastern windmill
appears on the map. The Eastern windmill (1) The door to the Eastern windmill is locked. Use the key to open
it. Immediately look to
the left after having entered
the windmill. Pick up the sketch
from the wooden container. Find your way up to the second floor. Look at the sofa.
Carol exclaims: This must have been where
the doctor lived. Take the message to Julian under the sofa. Read it,
and the Post-It note attached to it. Look at the large
matchbox on the wall opposite to the sofa. Try to take it. Carol says:
Its secured with a steel wire. Henry Milius (2) Go back to Henry Milius
and talk to him again. Henry Milius Store Room
appears on the map. Henry Milius Store Room
(1) There is a flashlight standing on a box slightly to
the right of the middle of the frame when you first enter the room.
Pick it up. Pick up an envelope
from the checkered pot. Read the letter from
the doctor, and the article about Polio. Carol comments: Well, I guess
I just have to try to get into Broxtowe. Lift the photo standing
to the left of the pot. Broxtowe (2) Walk past the front
of the institution and turn to the right. Look up at the wall
and see the gratings. Note the gear icon below the window. Leave the area. You
get an SMS from Jonas: SOS! Can
you meet me at the Craftsmens Café? The Craftmens Café appears on the map. The Craftsmens Café
(1) Talk to Jonas. The Linnea Shore appears on the map. The Lunda Wheel appears on the map. (If the Lunda Wheel doesnt appear on the map here, you have to go
back to Carols home and look at the card in the wallet to get the address). Linnea Shore Go to the very end
of the area. Youll find a dark opening in the mountain. Use the flashlight
and pick up the key. The Lunda Wheel Look beneath the stairs
and find a hacksaw blade. In inventory combine
the hacksaw blade with the hacksaw and get a hacksaw
with blade. Open the door and
pick up the ladder inside the small room. The Craftsmens Café (2) Talk to Jonas again. Broxtowe (3) Walk pass the front
of the institution, turn to the right and place the ladder under the
window. Use the hacksaw with
blade to saw the grating open. Enter through the window and you will
find yourself inside on the buildings first floor. Go forward five times
and turn left. From here you can enter the yard. Go forward a few times
until you see the old gazebo that youve previously seen in the old
photo. Carol exclaims: Its
still here! A bicycle pump lies to the left of the gazebo.
Pick it up. Go back inside the
building. From the same place that you entered the yard you can also
use the stairs to get to the second floor. While on the second
floor turn right, walk forward five times and turn right again. Look at the floor
in the blue cell in close-up. Pick up the round key. Turn right, walk forwards
once and turn right again. Use the round key
to open the towel dispenser. Pick up the tube-shaped
thing inside the dispenser. Get the coded message and the transparent
film. Carol comments: Its a transparent film. Turn around to see
a bathtub. Pick up the hammer and nails
from the bathtub. Henry Milius Storeroom
(2) Compare the coded
message from Broxtowe with the coded part of the message from Alfons
to Julian from the Eastern windmill. The signs on the coded message
from Broxtowe seems to read four right, two left, four right. Lift the green box
standing to the right of the checkered pot. Turn the compass according
to the coded message: four right, two left, four right. Read the postcard. Henry Milius (3) Talk to Henry Milius
again. The Boat Graveyard appears
on the map. The Boat Graveyard (1) Walk forward a few
times to see Julians old cruise ship. Carol says: That is Julian's old ship, no doubt. Theyve put some blue and
brown thing in front of it. I have to find a way to get out there.
Click the forward
icon in the water. Carol exclaims: Im not gonna swim all the way
out there. Carols allotment (2) Go back to the allotment
and pick up the rubber boat
from the blue shed. The Boat Graveyard (2) In inventory, combine
the rubber boat with the bicycle pump to get an inflated
rubber boat. Put the inflated rubber
boat into the water. Click the forward icon. Carol says: I need something
to row with. Use the tile from
inventory to row the boat. Try to open the metal
hatch at the front of the ship. Carol says Its rusted shut. Use the ladder to
get to the upper deck. Go left and then through a door to get inside
the ship. There is a staircase
leading down. Pick up the crowbar
that lies at the top of the staircase. Youll find a bar
near the center of the deck. Walk past it and look to the right. Pick
up the clippers that are on the small shelf. Go back to the hatch
at the front of the boat. Open it with the crowbar. Take the GPS receiver and the piece
of cardboard. John Milius Exhibition
(3) Place the piece of
cardboard on the painting with the multicoloured
quarter circles. Rotate it until 4 coloured
symbols fit the holes in the cardboard. The colours are green, black,
red, and blue. The Boat Graveyard (3) Climb through a window
in order to reach the interior of the ship.. Carry on forwards and go
through two doors. There is a safe to
the left in the flooded room behind the second door. It has a circle
on it in 4 colours. Press on the colours in the same order as you saw
the symbols through the holes of the cardboard: i.e. green,
black, red, and blue. Take the clock. Leave the ship. Someone attacks Carol
from behind! After finally managing
to get up, Carol exclaims: Oh no, whoever did that took the clock. Look at the big stone
with a metal loop on. Carol says: The person who knocked me out must have been standing behind
that stone. Look behind the stone
and pick up the magnetic stripe
card. The Eastern windmill
(2) Use the clippers to
cut the steel wire holding the large matchbox on the second floor. Look at the contents
of the matchbox. Carol
comments: I should try to find out more
about those stones. The library (2) There is a book entitled
From Bones to Stones - Brief
descriptions of local tourist attractions on the left shelf. Take
it down and read it. The Loredum Stones appears
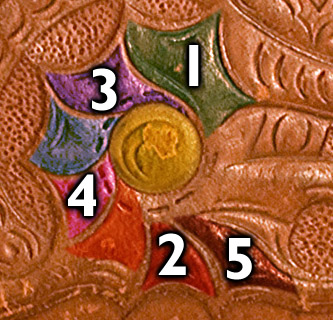
on the map. The Loredum Stones (1) Examine the stones
carefully. Notice that the shapes of some stones are identical to the
ones on the sketch from the Eastern windmill. To the right of the
entrance of the area, you will find a wooden ladder leading over the
fence. Pick up the two planks that have fallen off
the ladder. The Eastern windmill
(3) Go back to the Eastern
windmill and mend the ladder on the second floor using either the planks
or alternatively the hammer and nails from inventory. If Carol says
I think I need something else too. you have missed picking up either the hammer and nails from Broxtowe,
or the planks from the Loredum Stones area. Climb the ladder to
get to the top floor. As soon as you get
to the top floor you see some symbols on the wall and a nail above them.
Look at it in close-up, and hang the transparent film from inventory
on the nail. Turn around to where
the ladder leads down. Pick up the piece of paper on the floor. Its
an advertisement from a call-girl. Flip the advertisement.
Sundown Road The Loredum Stones (2) Compare the placement
of the stones on the sketch with the corresponding numbers on the transparent
film from the upper floor of the Eastern windmill. They are a2, b3,
b6 and b4. Sundown Road Ring the doorbell
and then turn to the right. Speak to Bigge. Enter
the apartment. Find the closet in the hallway. Try to
reach the box very high on the shelf to the right. Carol says: I cant reach it. Go to end of the living
room and pick up the dog food. Go back to the closet
and place the dog food under the shelf with the box. Try to stand on the
dog food. Carol says: Im too heavy
to stand on the lid. Place the tile on
top of the dog food and stand on it. When the different
coloured areas on the box are pressed, they produce a letter
in the round area in the middle. Press the areas in
the following order: Green (first from top), red (second from bottom),
purple (second from top), pink (fourth from top), brown (first from
bottom).
There is a matchbox
in the upper left corner of the box. Open it and look at the piece of
paper inside it. The cabin at Rawberry Road appears on the map. Ambers clients' cabin Knock on the front
door. No one opens it. Find the window leading
to the basement on the right side of the house. Open it and jump down. Turn left and enter
the room in front of you. Turn around 180 degrees.
Enter the house via the stairway. Turn right and go
forward to enter the kitchen. Search the waste paper
basket in the kitchen to find an old charger.
Carol comments: I
think this is an older type of charger. Go to the second floor.
Enter the bedroom with two unmade beds. Look in the chest
beside the door in the bedroom. Lift the photo and turn it around. Pick up the photo of Amber. Enter the other room
on the second floor. Find the ladder leading to the loft and climb it. Go to the end of the
loft and turn around. Pick up the key
from the floor. Go down the ladder. Use the key from the loft on the
light beige cabinet beside the exit door. Find the notepad in
the cabinet and read the unfinished letter. Go down the stairs
to the dining room. Look at the program
on the chest. Note the colours on the flag for the Hot Oxes. Find the bathroom
in the hallway on the first floor. Examine the bag on the right. Press
the buttons on the 3-colour pen in the same order as the colours on
the Hot Oxes flag, i.e. red, black, green, and finally red. Carol says:
These look like GPS coordinates. Take the GPS coordinates. Carols home (3) In inventory, combine
the GPS receiver with the old charger to get a GPS
receiver with charger. Plug the GPS receiver
with charger in the wall socket in the living room close to the window.
Wait a while and pick
up the GPS receiver. Press on the buttons
on the GPS receiver twice. Carol says: Lets see.... Amber's apartment appears
on the map. Ambers Talk (she lost a
bet and may only write) to the young woman. When she asks you
for an invitation you can answer Oh
yes, its right here if youve picked up the photo of Amber in
Ambers clients' apartment. If not, you have to go back to Ambers clients'
apartment to get the photo. Talk to Amber. When Amber asks you
what you can do for her, give her the ring. If you dont have the ring,
you have to go back to the second windmill to get it. Sundown Road Go back and talk to
Bigge again. You are automatically
transported to his apartment. Go behind the green
drapery in the hallway and turn immediately right. Grab the painting
of the Loredum Stones and turn it around. Carol says: Ambers Talk to Amber again. Knoel Street 24b Go forward 5 times and then turn to the left. Enter the 24 hour yard sale. Find a hockey stick on sale. Take the hockey stick. Pay for the hockey
stick in the small basket on the yellow table using the cash from inventory.
Leave the yard sale
and find the opening in the fence at the other side of the road. Carol finds Go to the other side
of the house and turn around the corner. Look through the broken
window. In inventory, combine
the hockey stick with the sticky stuff to get a sticky
hockey stick. Use the sticky hockey
stick to obtain the paper which is inside the building. The Electro Junk Workshop appears on the map. The Electro Junk Workshop Use the magnetic stripe
card from the boat graveyard to open the door. Inside the workshop
turn left, and open the small cup in front of you. Pick up the carpet knife and read the article and the
letters. Turn around 180 degrees
and take the key from
under the loudspeaker. Enter the inner room
and open the cupboard with the key from under the loudspeaker. Open the metal box
and take the pistol. Pick up the jiffy
bag and open it with the carpet knife. Get the note with codes. This is a clue that will
help you interpret the meaning of the transparent film that you placed
on the symbols on the upper floor of the Eastern windmill. The codes
correspond to hours of the day: A1 = one oclock Close the cupboard
and turn to the right. Open the cupboard
which is now in front of you. Take
the clock. Carol says: So here it is. Leave the workshop. Carols home (4) Carol is now automatically
transported to her apartment. She puts down the clock on a table in
her computer/TV room. Lift the clock. Carol
says: I
wonder if this can be opened somehow? The stones we have
seen on the sketch correspond to the codes b2, a3, b6 and b4. According
to the note with codes from the electro junk workshop, they correspond
to the following hours of the day: 11, 5, 10, and 9. Open the clock by
turning the hands to 11 oclock, 5 oclock, 10 oclock, and 9 oclock. If the clock doesnt
open, you havent opened the jiffy bag in the electro junk workshop
and/or placed the transparent film on the nail on the upper floor of
the Eastern windmill. Read the message inside
the clock. The Broby Sanitarium
appears on the map. Broby Sanitarium (1) Go to the very end
of the area to find the annexe. Enter the annexe through the door on the short side. Go forward 5 times,
and turn left. Open the door. Look at the right
side of the desk in close-up. Take the pliers. Close the door, turn
left, walk forward twice, and then turn left again. Look at the key in
the lock in close-up. Try to turn it. Carol says: A key... Theres no way I can turn it with
my bare hands. Turn the key with
the pliers. The door opens. Look at the small
white envelope on the shelf in the green room. Pick it up and open it. Take the key from the envelope. Broxtowe (4) Enter Broxtowe again. Go upstairs by going forward 5 times, turn left, and
use the stairs. Turn right, go forward
twice, and then turn left. Try to open the metal door. Its locked. Use the key from Broby
to open the metal door. Carol enters the burnt-down
attic. She says: I
need some protection before going up here., and doesnt
want to proceed. The Craftsmens Café (3) Talk to Jonas again. Take the helmet lying in from of Jonas. Broxtowe (5) Enter the attic again. Turn right immediately,
and pick up the screwdriver
lying on the ground. Proceed further into
the attic until you find a dark room. Use the flashlight
to light up the dark room. Look at the locked
chest in the room. Broby Sanitarium (2) Enter the annexe. Walk forward once,
turn left, forward, and left again. Look at the towel
dispenser in close-up. Use the towel dispenser
key to open it. Remove the towel dispenser
with the screwdriver. Read the message on
the wall. Broxtowe (6) Enter Broxtowe again.
Go forward 4 times, turn left, go forward, and turn left. Look at the lamp hanging
down from the ceiling. Remove the cover from
the lamp. Take the key inside the lamp. Turn left, walk forward
once, turn left, walk forward once, and turn left again. Use the stairs.
Turn right, go forward
twice, and then turn left. Open the metal door. Go to the end of the attic. Use the flashlight
to light up the dark room. Open the chest with
the key from the lamp. Lift the right-hand
banana box. Take the envelope
with the formula. Leave Broxtowe Before you get out of the building, Carol gets an
SMS. "I think you've missed something". The Go to the very end of the interior of the hospital. Turn
around, and David Larson will turn up in front of you. Talk to David Larson. When he starts telling Carol to get down on her knees,
look up at the brick wall. Take the gun from inventory and shoot at the wall. Click on the forward arrow to escape from the vicinity. Carols home (5) Read the letter that Carol has written to Stina. It explains
the whole series of events. Read the epilogue which describes what happens to the
characters after the mystery has been cleared up. Finally view the Credits. CONGRATULATIONS ON COMPLETING
AMBER'S BLOOD! Hope you enjoyed it !! |